


We interrupt our regular tech-focused content to focus on another sort of technology. Because I asked our readers what to write about, and one guy said I could do this if I wanted.
One of the joys of the years since I left journalism for the tech industry has been finding space in my life for hobbies. Back when I was running The Tech Report, I had made my hobby into my job. Can’t say I recommend that, in some ways. There wasn’t a lot of extra room—or money—in my life for much else. Between work and family obligations, I had no space for other activities and, honestly, not quite enough space for the family side of things.
Working a corporate job requires some long hours, but it’s honestly nothing next to how I worked myself as a reviewer. So after a little bit of adjustment to something like a normal work schedule, I was able to embrace some hobbies.
And, well, look out.
Like a lot of folks with, uh, nerd-adjacent inclinations, I can get pretty deep down a rabbit hole in a hurry. I fell hard into building mechanical keyboards some years ago and now have a crazy collection of those. But my most recent enthusiasm, in the past few years, is high-power amateur rocketry.
Like a rocket
I got into this one almost accidentally, by accommodating my two younger sons’ childhood interest in rockets. The second son in particular is given to enthusiasms, and rockets were very much on his agenda. So we pulled an old Estes model rocket kit off of the shelf, found a spot to launch it, and gave it a shot. Soon, we were building new model kits and looking for local clubs with more space to launch.
That was good fun, but nothing we did there prepared us for when, almost on a lark, I took the boys to an event called AirFest that happens annually in, well, a giant empty field in south-central Kansas affectionately known as The Rocket Pasture. After harvest each year, this vast, open space is an ideal location for hobbyists to practice amateur rocketry without worrying too much about a wayward rocket landing on something in a bad way. The local club, known as Kloudbusters, regularly gets a waiver from the FAA for flights to altitudes as high as 50,000 feet, and people come from all over the nation—and even from other countries—to launch rockets there. It’s one of the premier launch sites of its type anywhere, and it’s just under four hours’ drive from our house outside of Kansas City.
I still remember the first impression upon getting out of our car around 10 a.m. on Saturday morning, about four years ago, with the launch already underway. As we walked from the car to the launch area, the voice on the loudspeaker announced a series of flights—with the name of the flyer, the type of rocket, the type of motor, and maybe a sense of what to expect—and one by one, the rockets took off spitting flames of red, blue, and green and reaching sometimes ridiculous velocities and extreme altitudes in seconds.
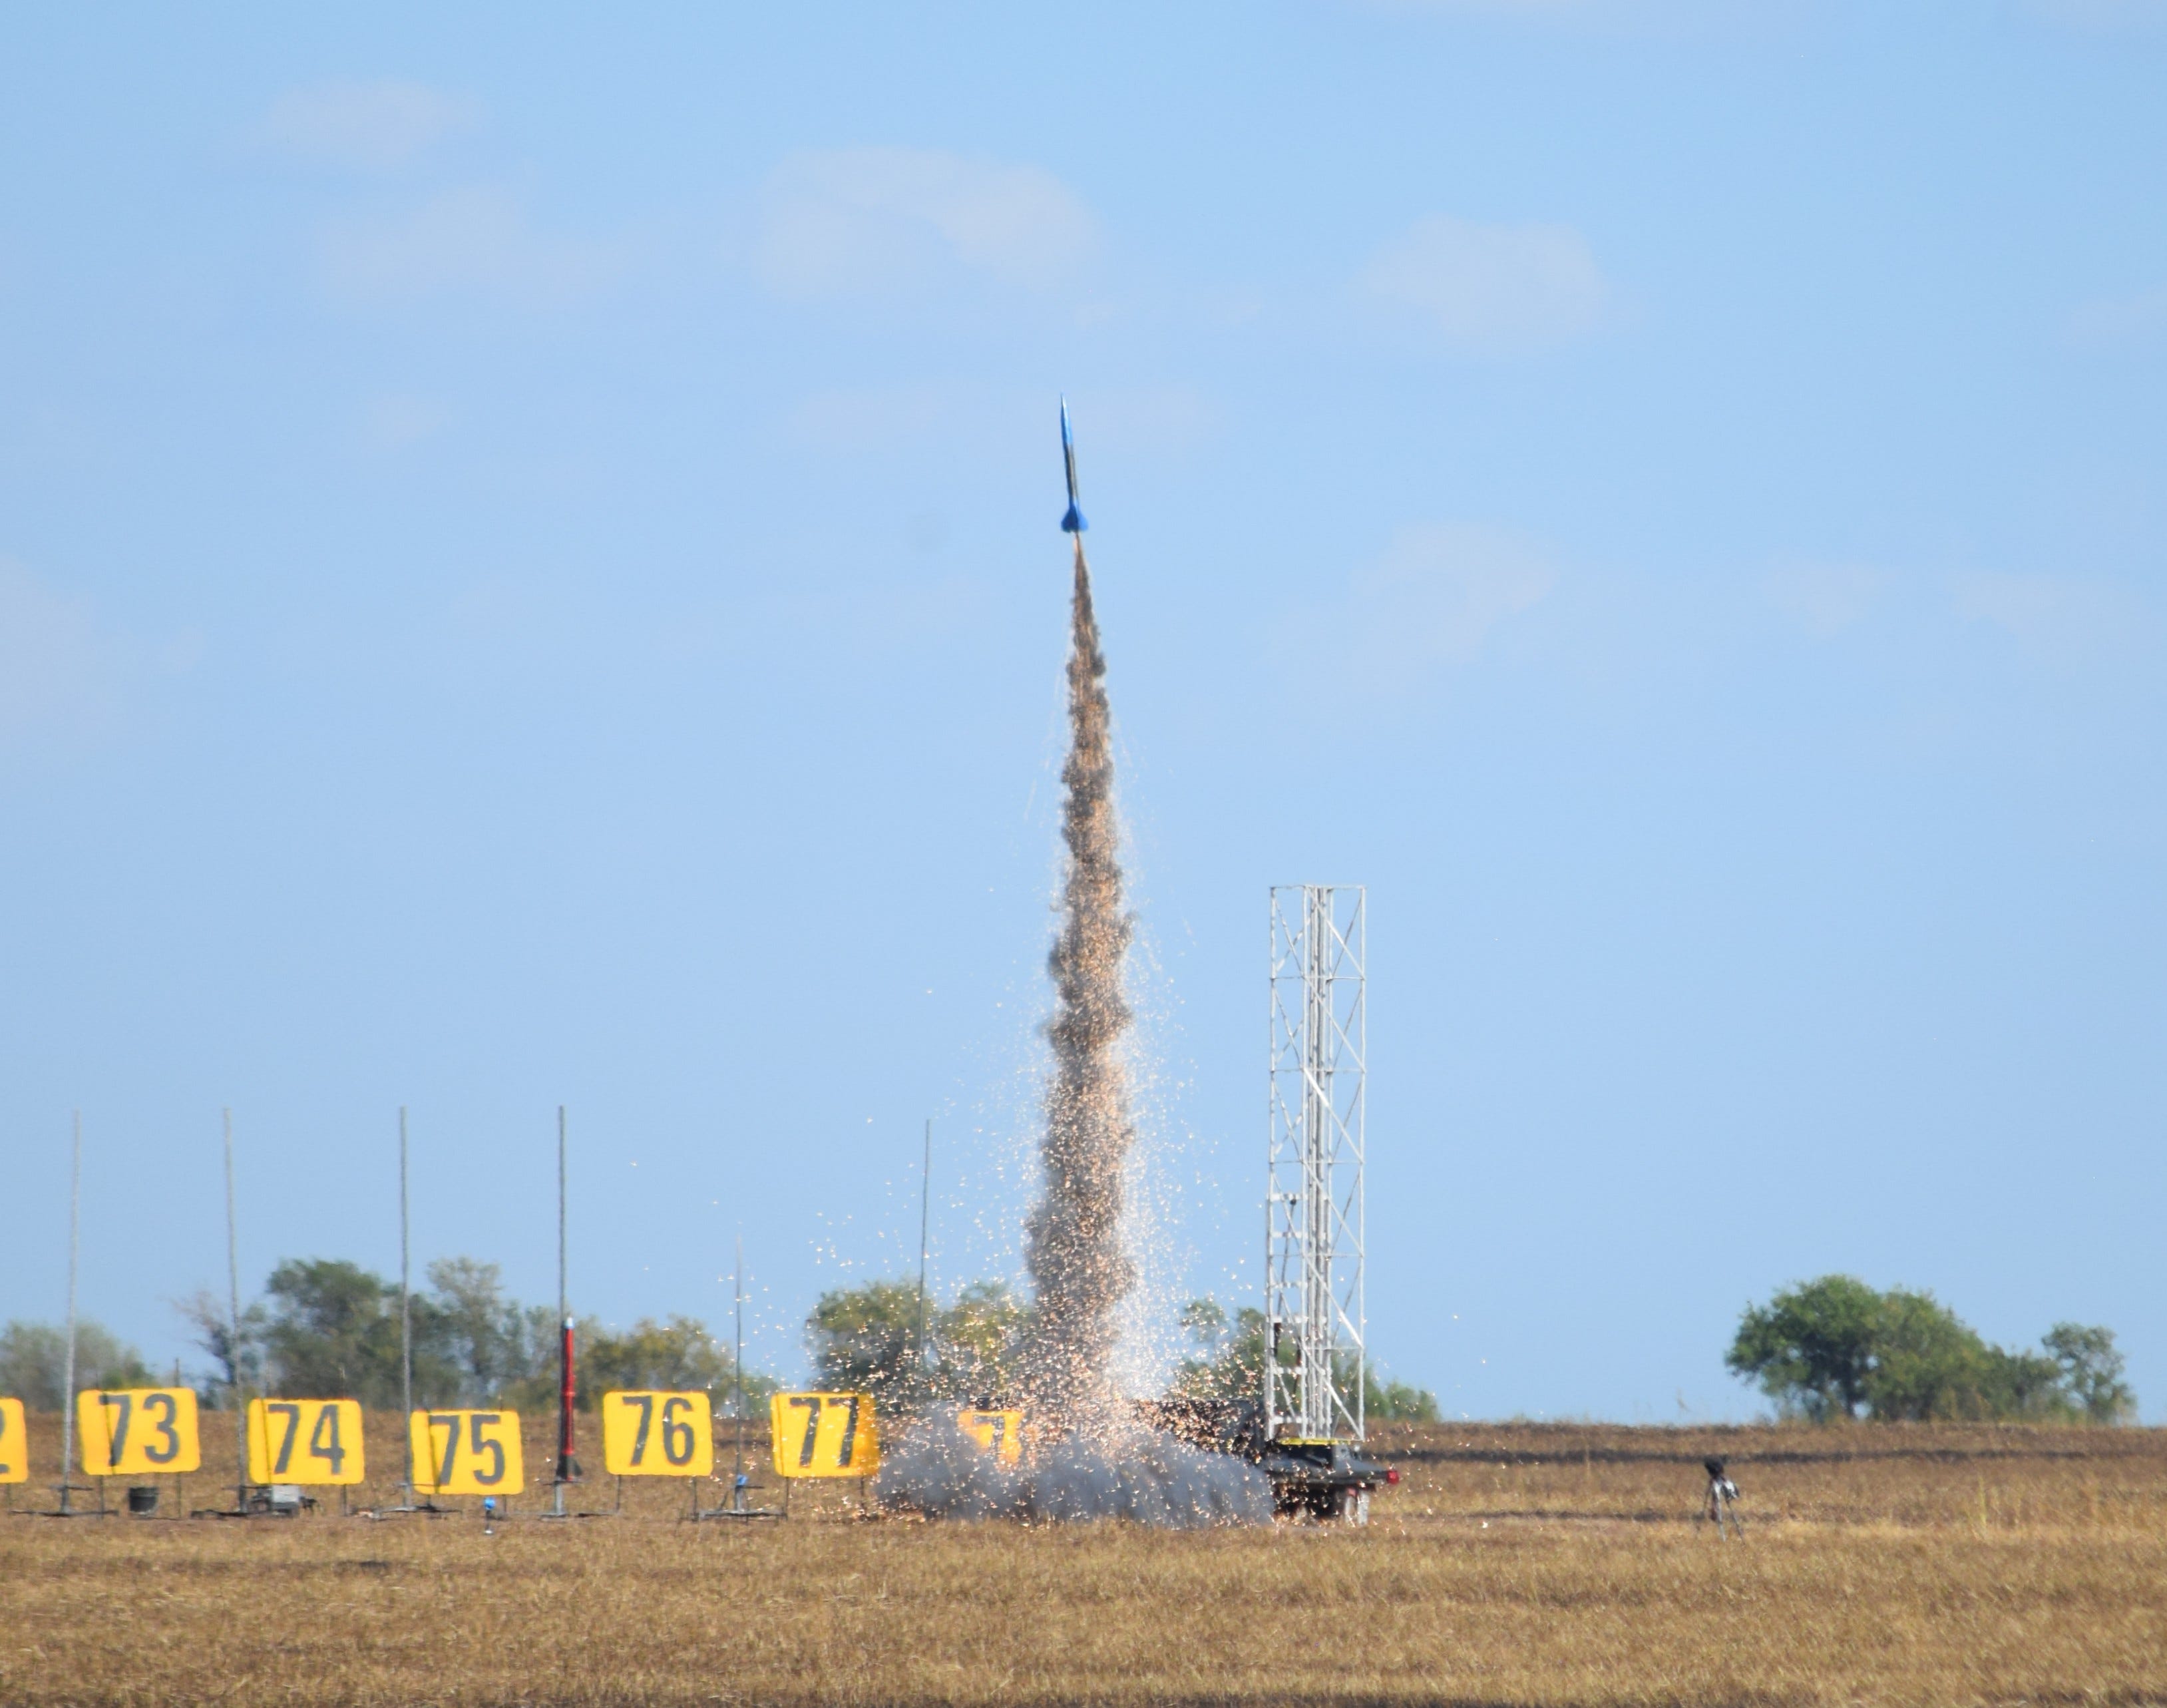
Occasionally, everything would slow down as the announcer would direct the crowd’s attention to a more distant launch pad, and then a much larger rocket on an enormous motor would take off with a giant plume of smoke and a sound similar to a jetliner’s.
The boys and I were transfixed.
We’d brought our own model rockets to launch, such as they were, but we sat there enthralled by watching these people enjoying an obviously more advanced form of the technology.
I remember at one point walking across the open range to recover one of my sons’ rockets and thinking to myself that moving was oddly somehow more difficult than it should be. I didn’t register why until, at the end of the day, I returned to my car and saw a temperature reading of something like 102°F (~39°C). I was too captivated by the whole experience for the fact of the extreme heat to fully register.
What followed was a quick series of steps down the rabbit hole. By the next AirFest, I was flying a Level 1 high-power certification flight, and my second son was flying his junior high-power cert flight, both on rockets we’d built for that purpose. Next spring came my L2 certification on an even larger motor, along with rocket builds that delved first into altimeter-based parachute deployment and then two-stage flights with electronic air starts. At our third AirFest, my youngest son got his junior high-power certification, as well. That meant that anything I could fly, the two boys could fly, too, under my supervision.
To get there, we developed proficiencies in various arts of rocket fabrication, simulation tools, 3D printing, electronics soldering and assembly, remote telemetry and tracking, handling black powder deployment charges, spray painting, and so forth. (And sanding. So much sanding.) The learning curve was steep but exciting, and the resulting flights were typically rewarding. We flew rockets a mile high or more at speeds nearing Mach 1 and recovered them successfully. Even the failures were learning opportunities, so long as we kept things in the proper context.
New materials for new frontiers
Late last year, the time came to decide on our projects for AirFest 2026. Up until then, most of the rockets we’d built were constructed from cardboard with plywood fins and plastic nose cones. Those materials are cheap, light, and relatively sturdy, so they make sense for everything from a tiny Estes model rocket to a five-foot-tall high-power kit like the one I used to get my L1 and L2 certifications.
But such materials aren’t always robust enough to handle the forces involved in flights to Mach 1 and beyond. And that’s exactly the sort of flights that my second son and I wanted to attempt next. As we’d done in the past, we decided to build similar rockets and fly them independently, with a little cross-team support where needed. (The youngest, who is a bit behind us progress-wise, started work on a rocket with electronic dual deployment.)
We decided to build our new rockets from fiberglass components provided in kits by Wildman Rocketry. Both rockets would be roughly seven feet long with a lower section, an electronics bay, an upper tube or payload section, and a nose cone—all fiberglass save for the aluminum tip of the nose cone. I chose a Wildman Drago 3XL kit for my build, and my son decided on a 3” DarkStar, which looks cooler but is more complicated to build due to its fancy dual-fin setup.
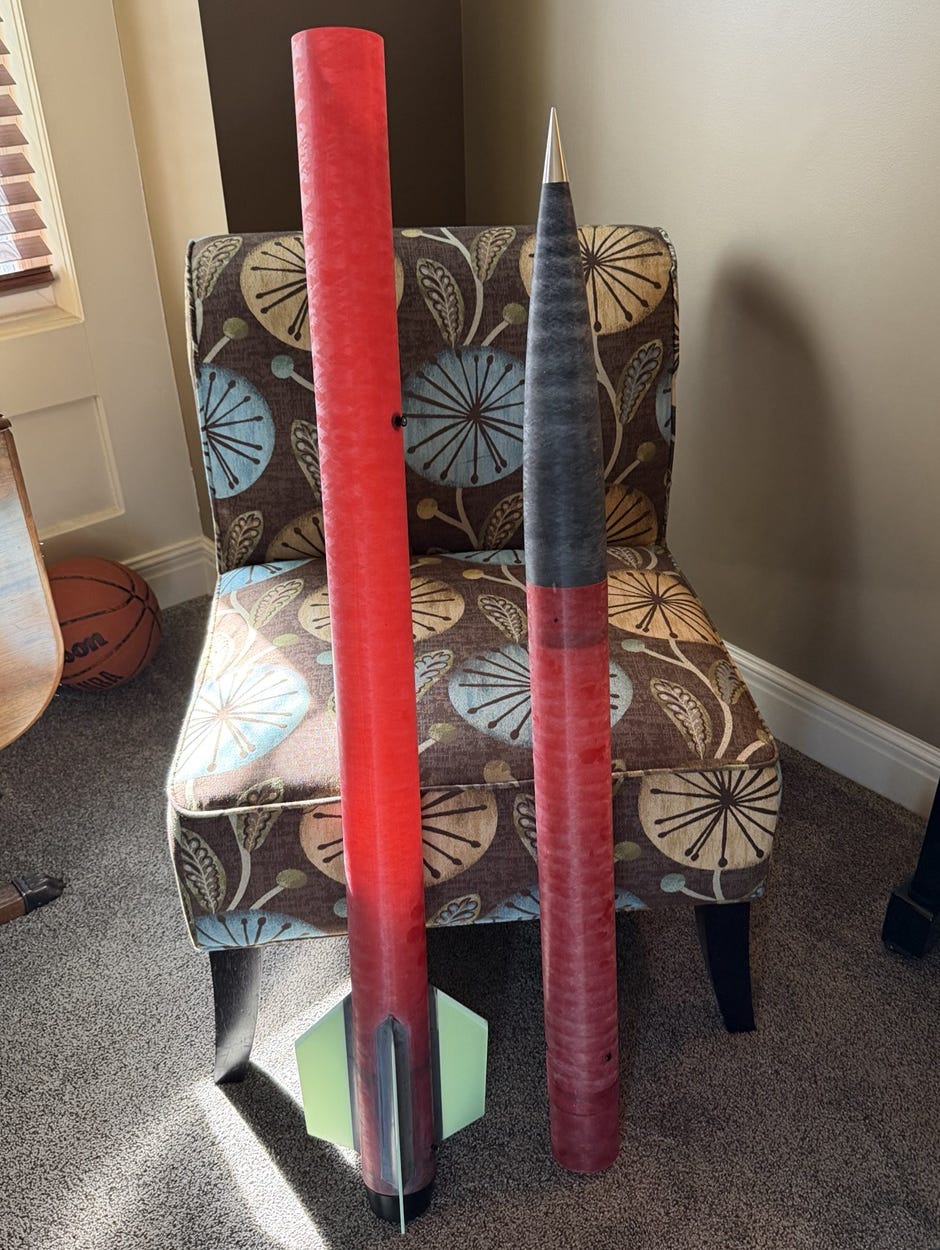
These kits come with 54-mm-wide motor mounts capable of accommodating relatively large motors.
To give you a sense of context, let’s talk briefly about rocket motor sizes. The typical Estes rocket you may have seen launched in a park or in Boy Scouts has an 18-mm motor mount and a motor rated in the “C” impulse class. Impulse is the total thrust over time created by the motor. The impulse classification system is based on letters in alphabetical order. The upper limit of each successive classification range is twice that of the previous class. So a D motor can have twice the total impulse of a C, an E motor can offer twice the total impulse of a D, and so forth.
Our plan was to fly K and L motors in these rockets. We estimated that the larger of the two, an Aerotech L1000W, should take one of these rockets to around 12,000 feet above ground level at a peak speed of around Mach 1.4—or over 1,000 miles per hour.
Which, I mean, is awesome.
The project of building these rockets turned out to be fairly complex, even though I thought I knew what I was getting into. When you’re putting an object this large, sturdy, and pointy into the air at high speeds, there’s some added responsibility to make sure nothing goes horribly wrong. In our case, that meant working to ensure robust construction and strong bonding with unfamiliar materials, as well as assembling a more complex set of avionics systems with true redundancy.
I won’t go too far into the details of the build process, but as I said before, there’s a lot of sanding and surface prep, which is basically just getting everything ready for bonding with epoxy.
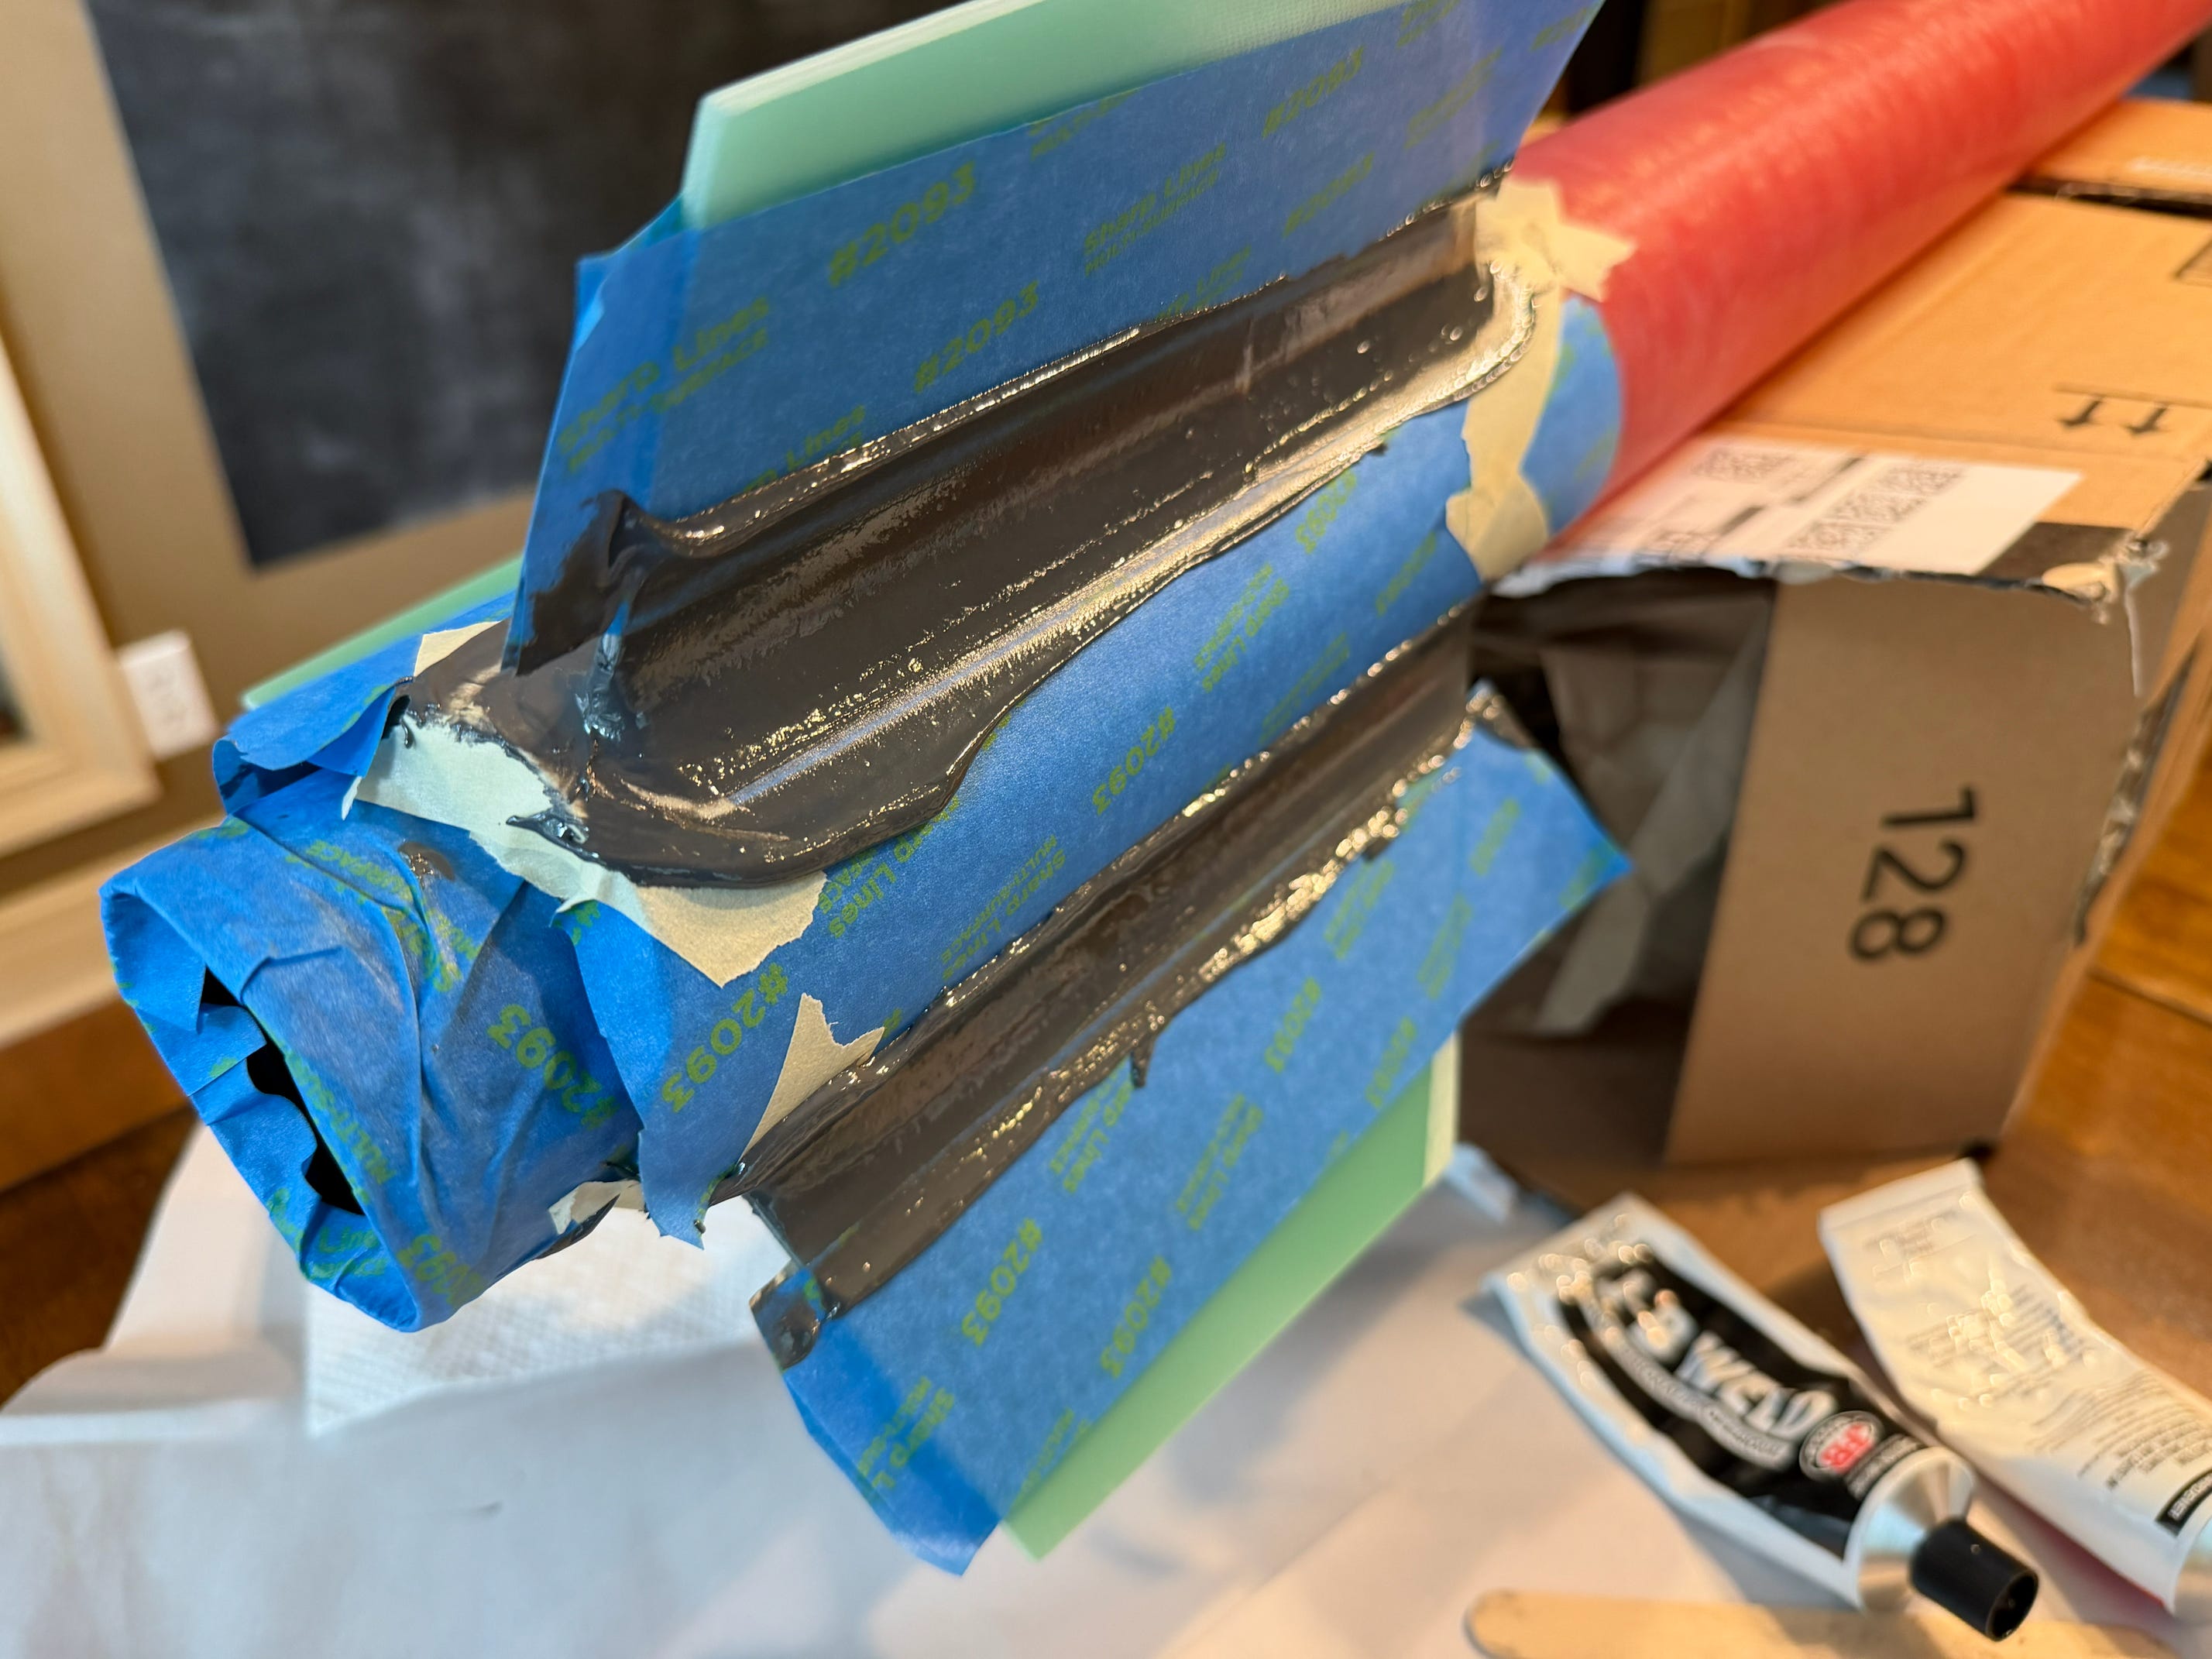
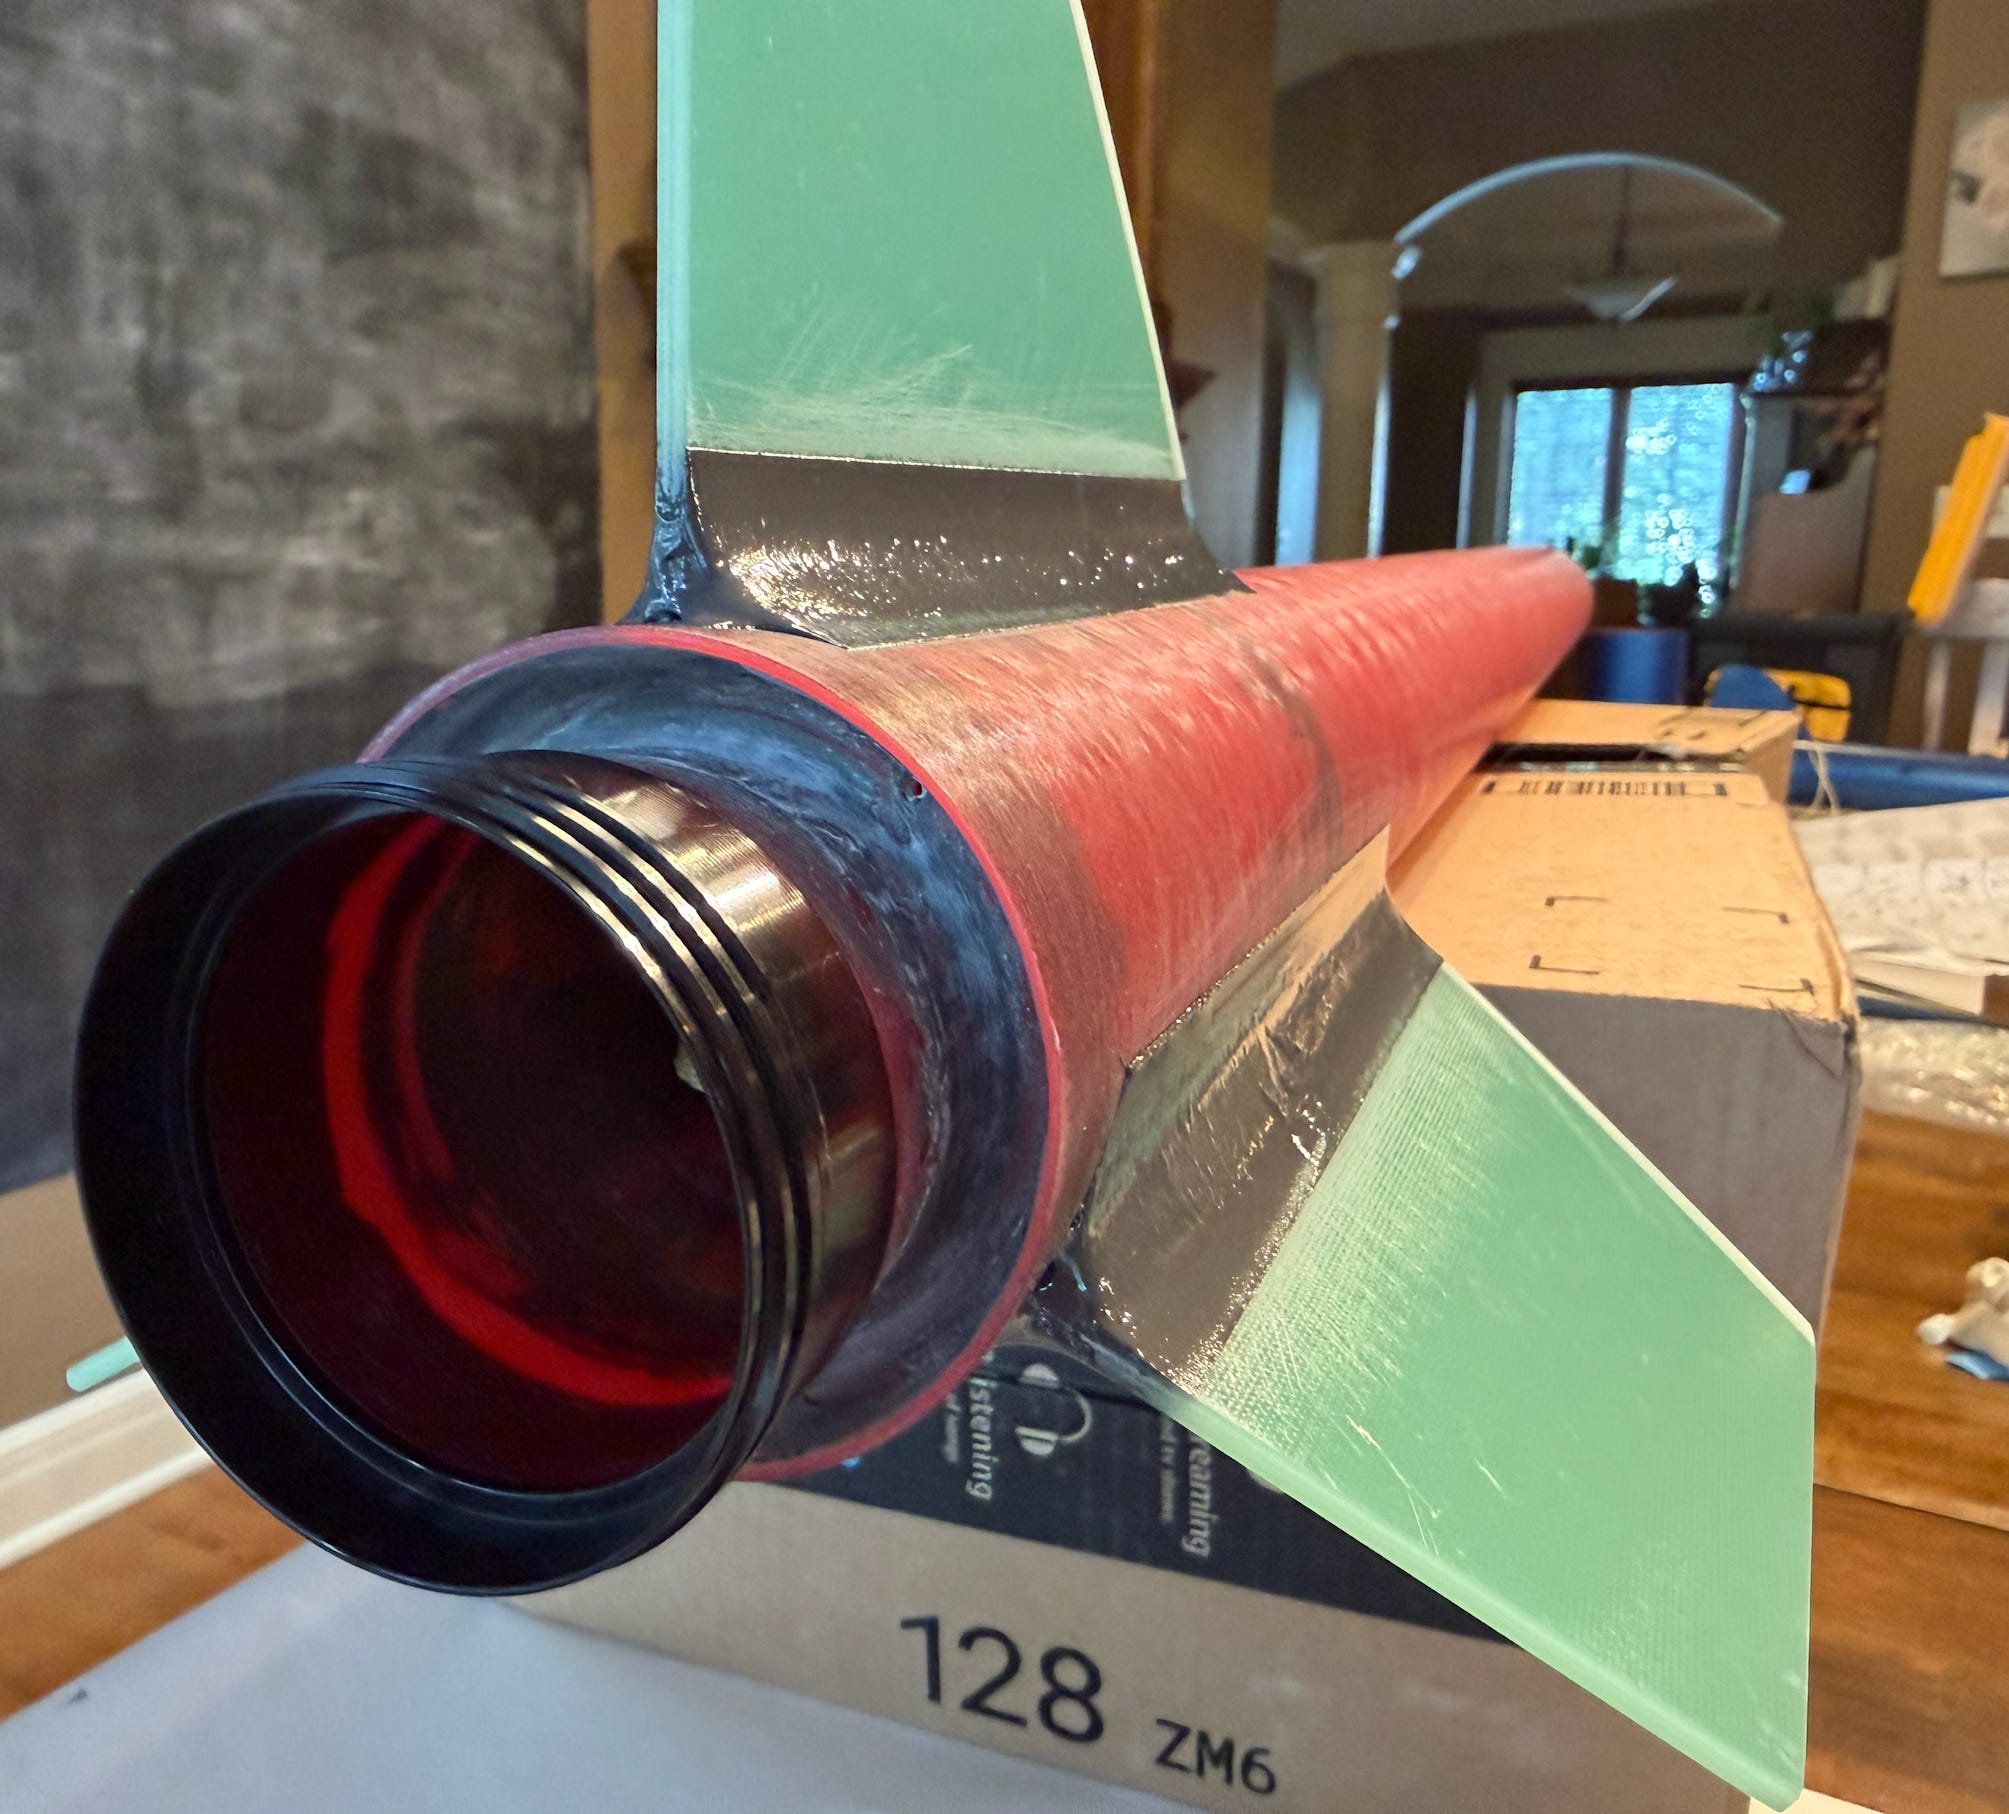
Here’s a quick look at one of the more interesting building steps, which is assembling the “fin can” section. You’re basically fitting the fins into pre-cut slits in the body tube and using epoxy to hold them in place. We chose to use JB Weld for this purpose, since it’s easy to work with and widely available.
As you can see below, I masked off the appropriate areas, applied big globs of epoxy, and dragged a large socket through it to create big, beefy fillets between the fins and the body tube.
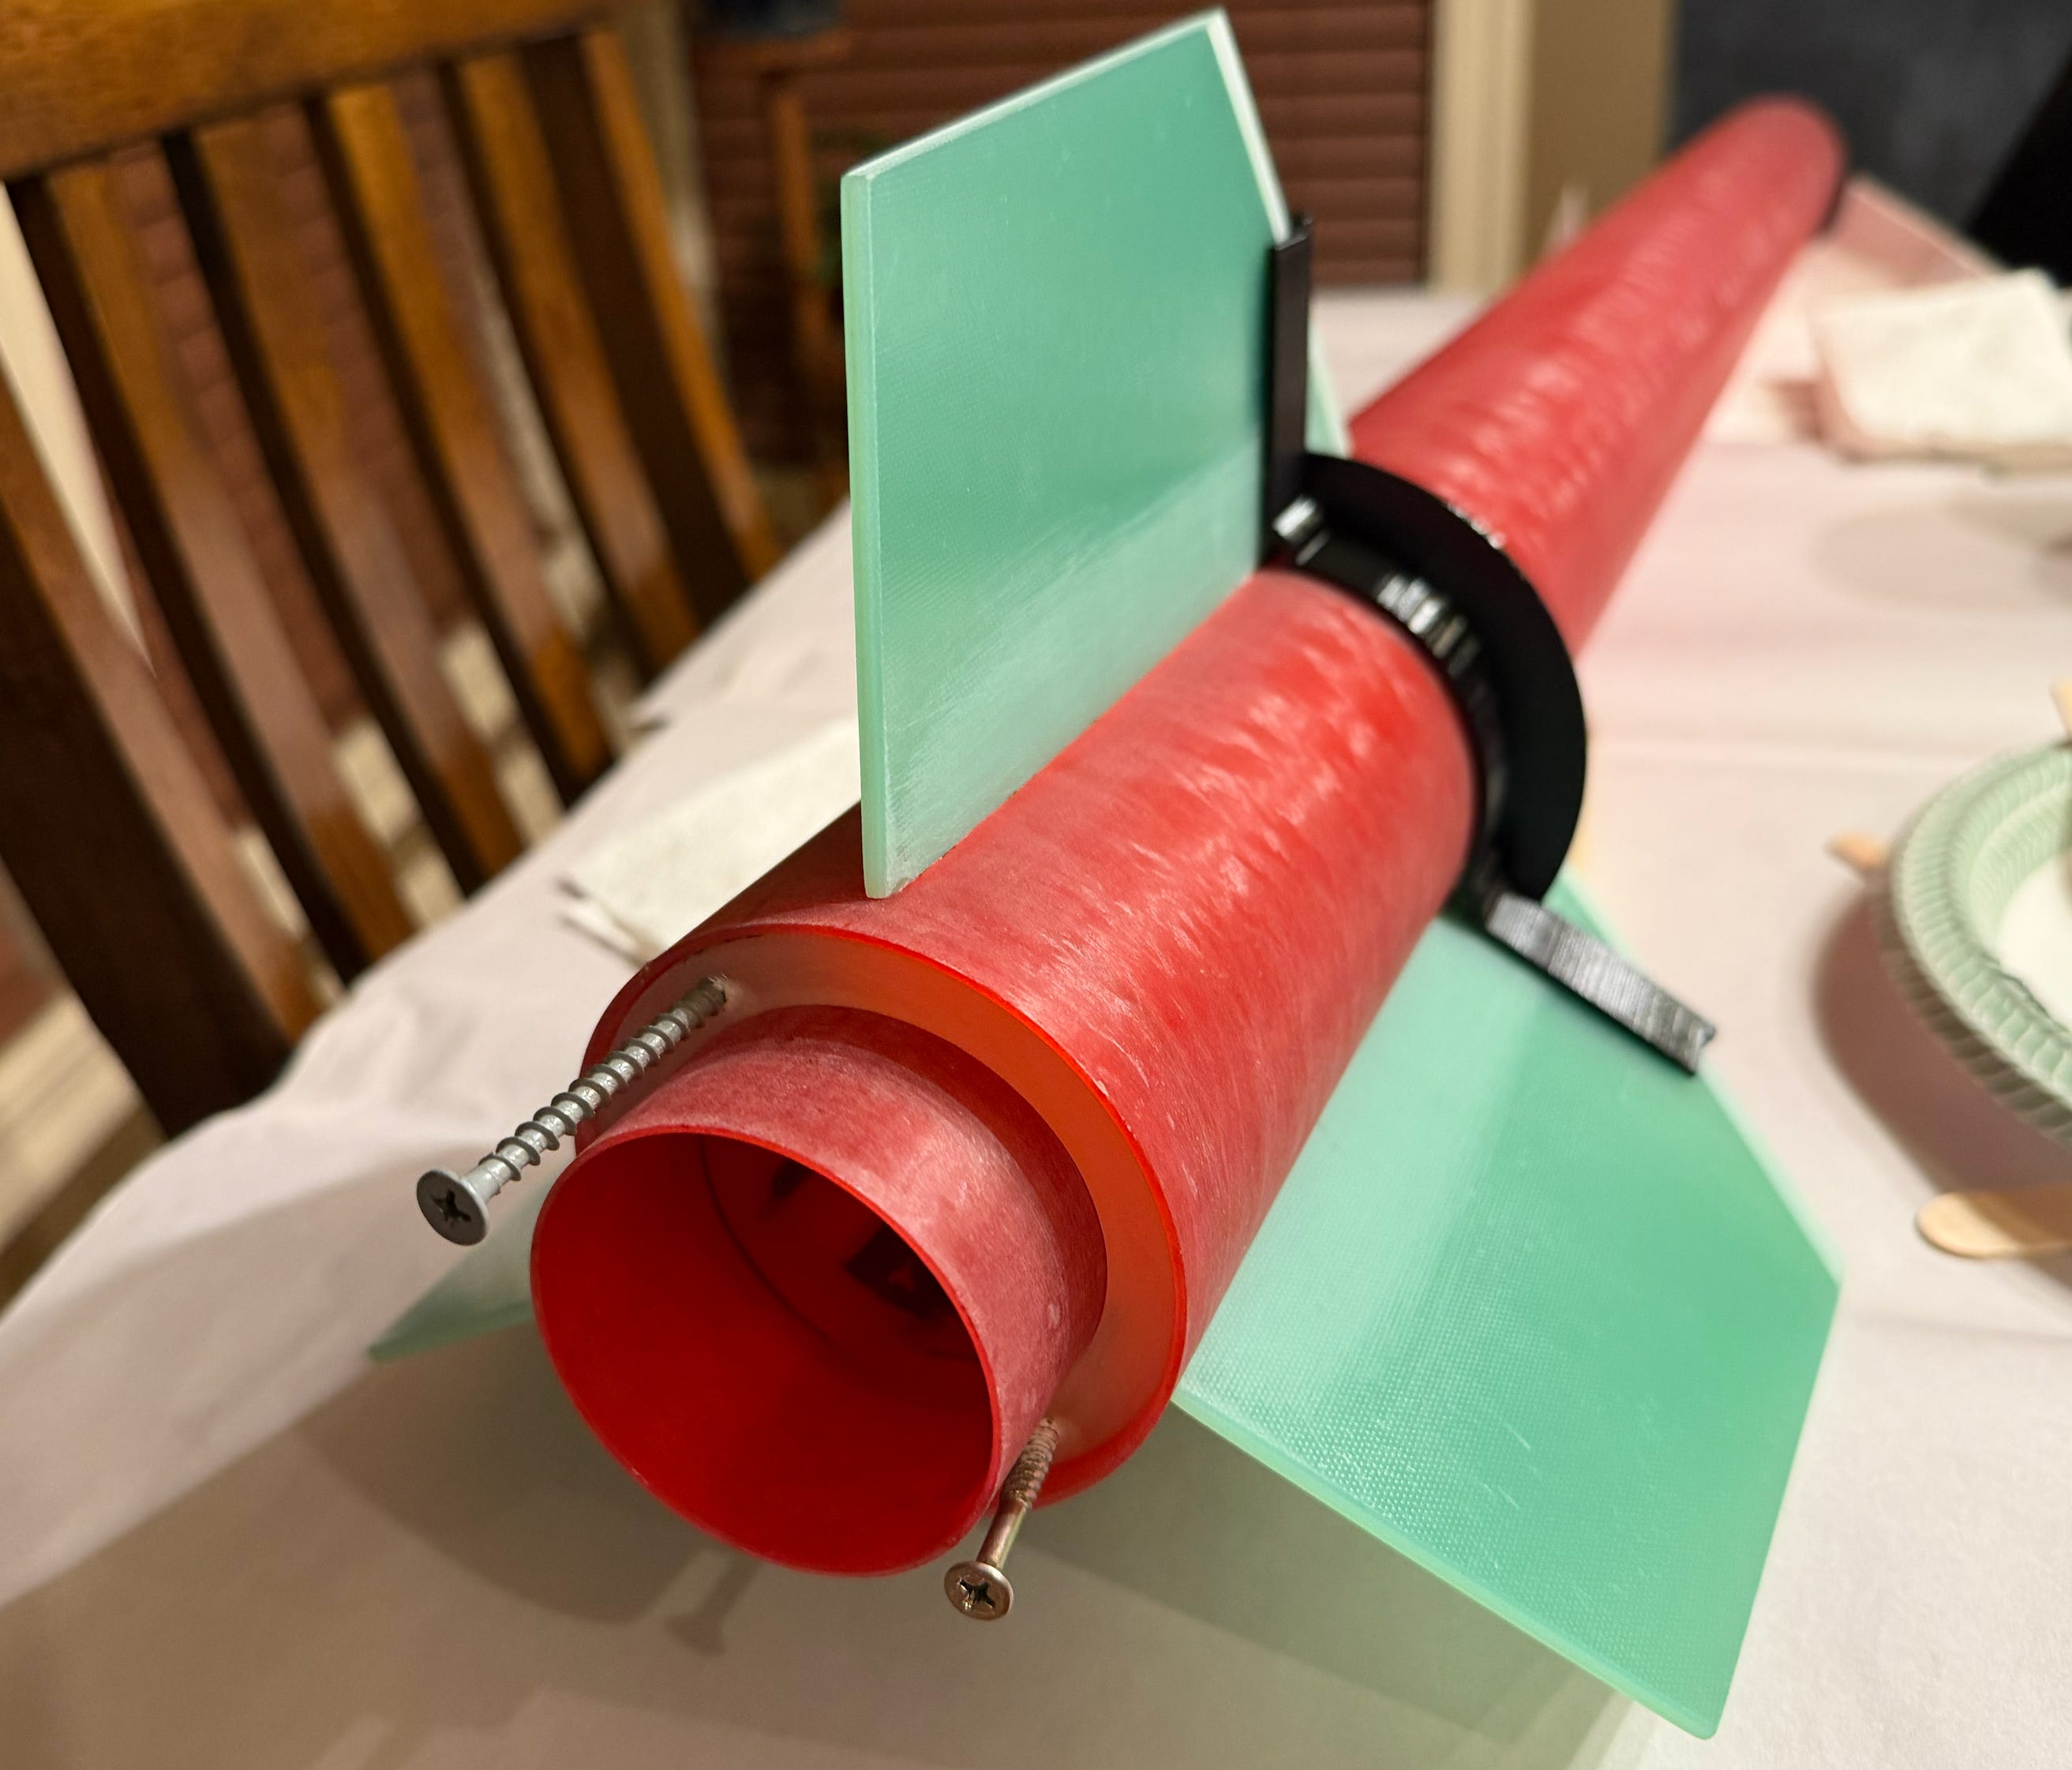
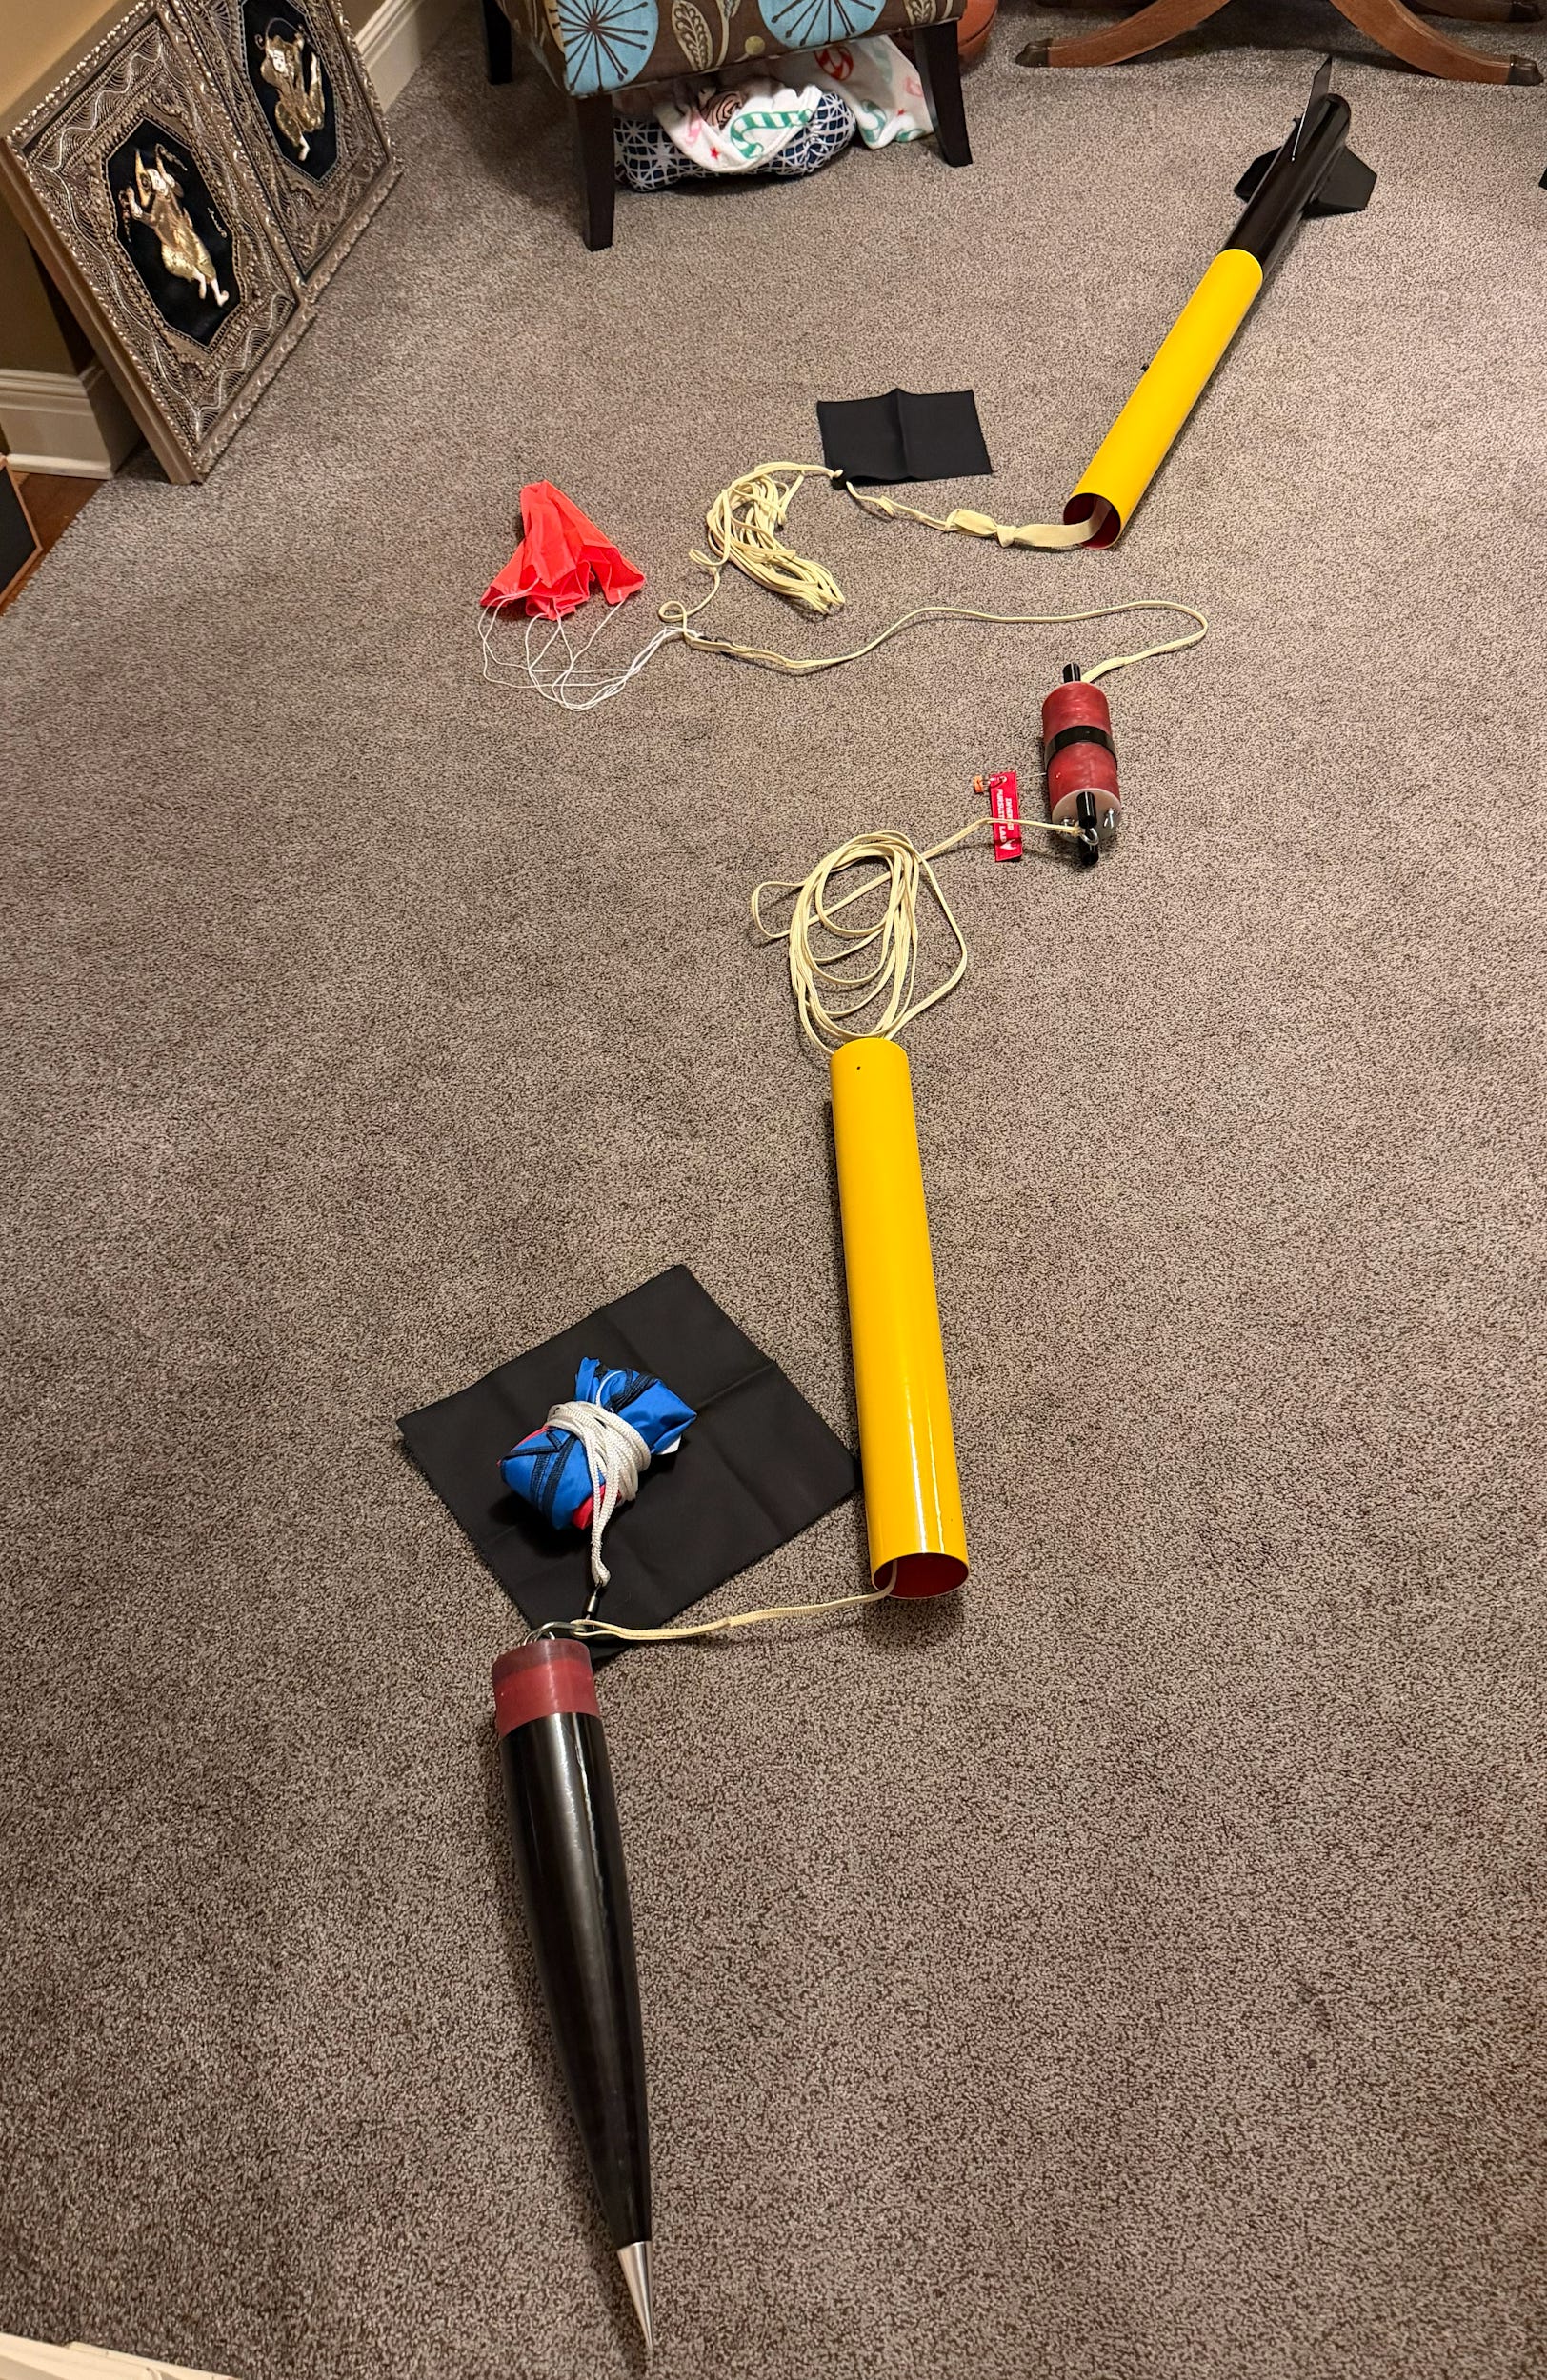
In addition to the fiberglass tubes provided in the kit, building a rocket like this one involves one or two fabric parachutes, some Nomex parachute protectors (just squares of fireproof fabric), and lots of Kevlar cord. It also involves a fair amount of metal hardware, typically 1/4” bolts and such. We paid our visits to The Home Depot and got it all sorted.
Building the rocket’s brain
The basic flight plan for this sort of rocket is just an up-and-down arc, with a couple of events in the middle.
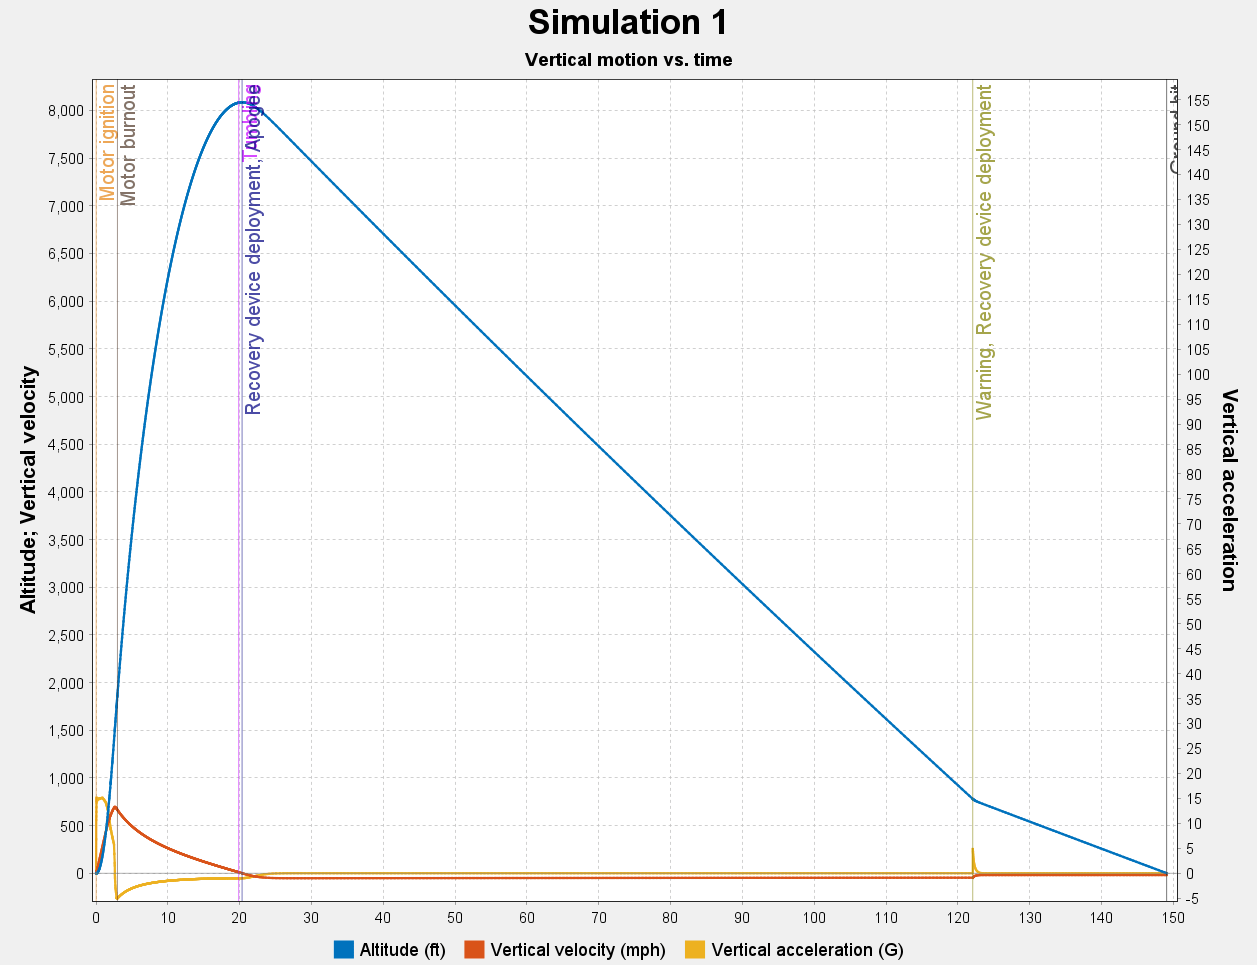
The first event happens at the top of the arc, right as the rocket reaches the apogee of its flight and begins to arc over. The rocket should be moving slowly at this point, and we take advantage of that opportunity to fire a black-powder charge. This charge separates the lower portion of the rocket from the upper section, preventing the intact rocket from arcing over and accelerating nose-first downward. Instead, the rocket should tumble down from apogee, aided in this case by a small, 18”-wide parachute called a drogue. The point of the drogue is to slow the rocket’s descent but not too much. Deploying a full-size parachute at high altitude can cause a rocket to drift miles away in the wind.
The second event is the deployment of the main chute, which in our rockets is 40” wide and housed in the upper payload section, just below the nose cone. I programmed my altimeter to fire the charge to eject the nose cone and deploy that chute at 700 feet off the ground—long enough for the parachute to unfold and catch the air, further slowing the rocket’s descent before it hits the ground.
The key to making those things happen is the avionics bay, a cylindrical section that lives in the center of the rocket.
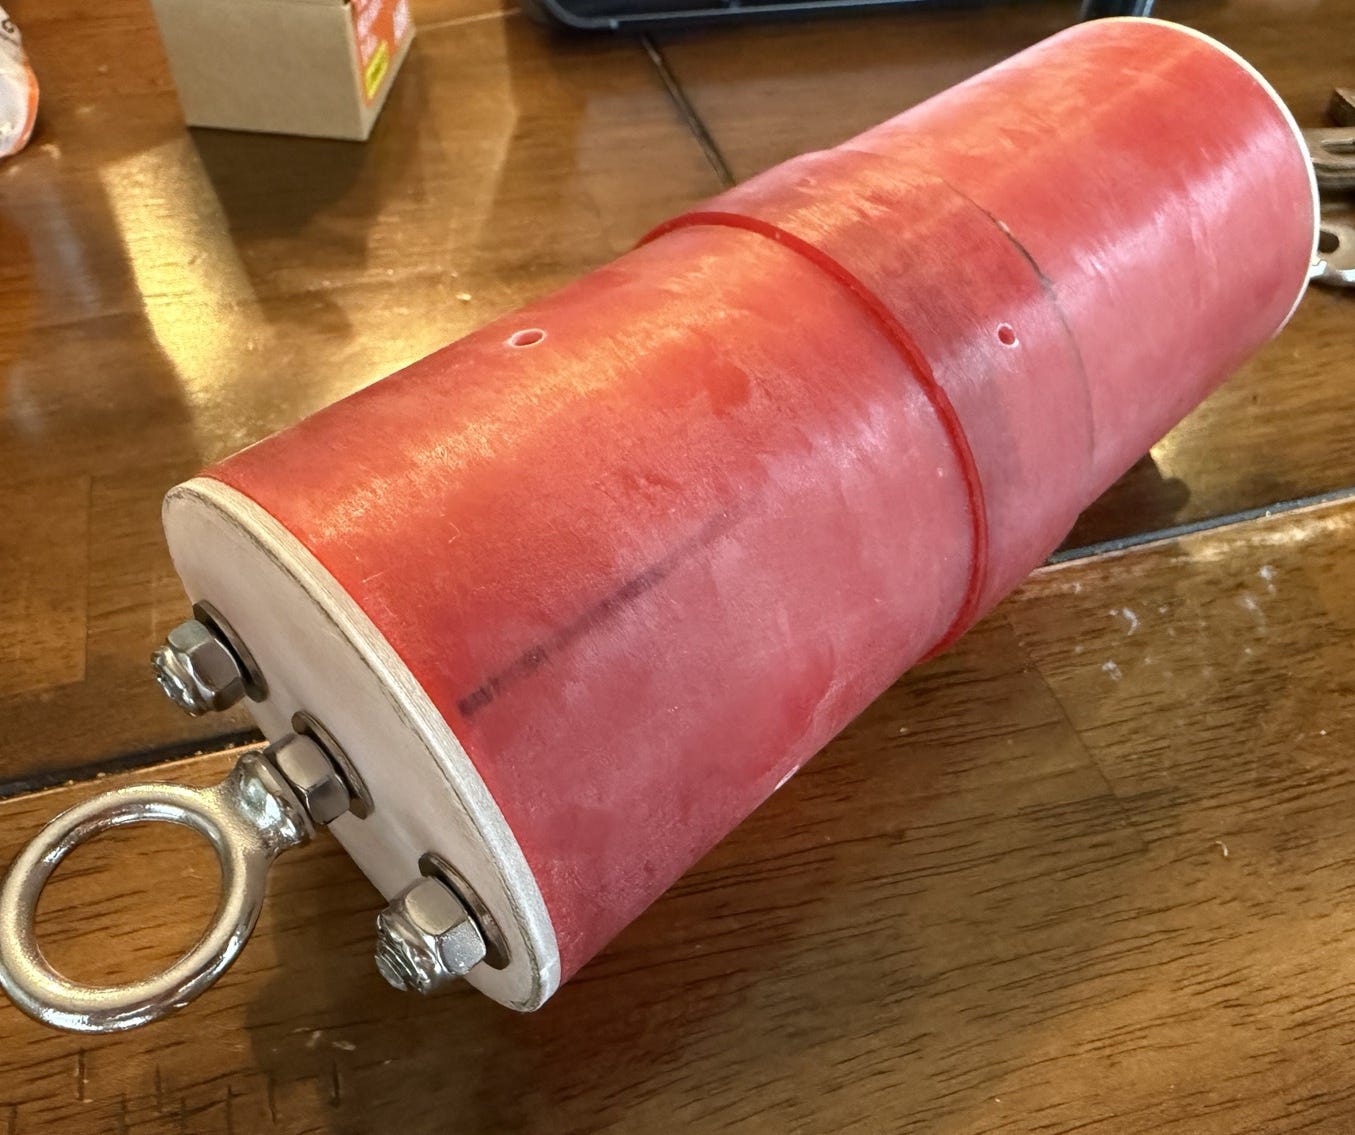
This thing is both the brains and the backbone of the whole operation. It houses all of our electronics, of course. It also connects the lower and upper tubes of the rocket together, and the Kevlar cords of the upper and lower recovery harnesses also connect to it.
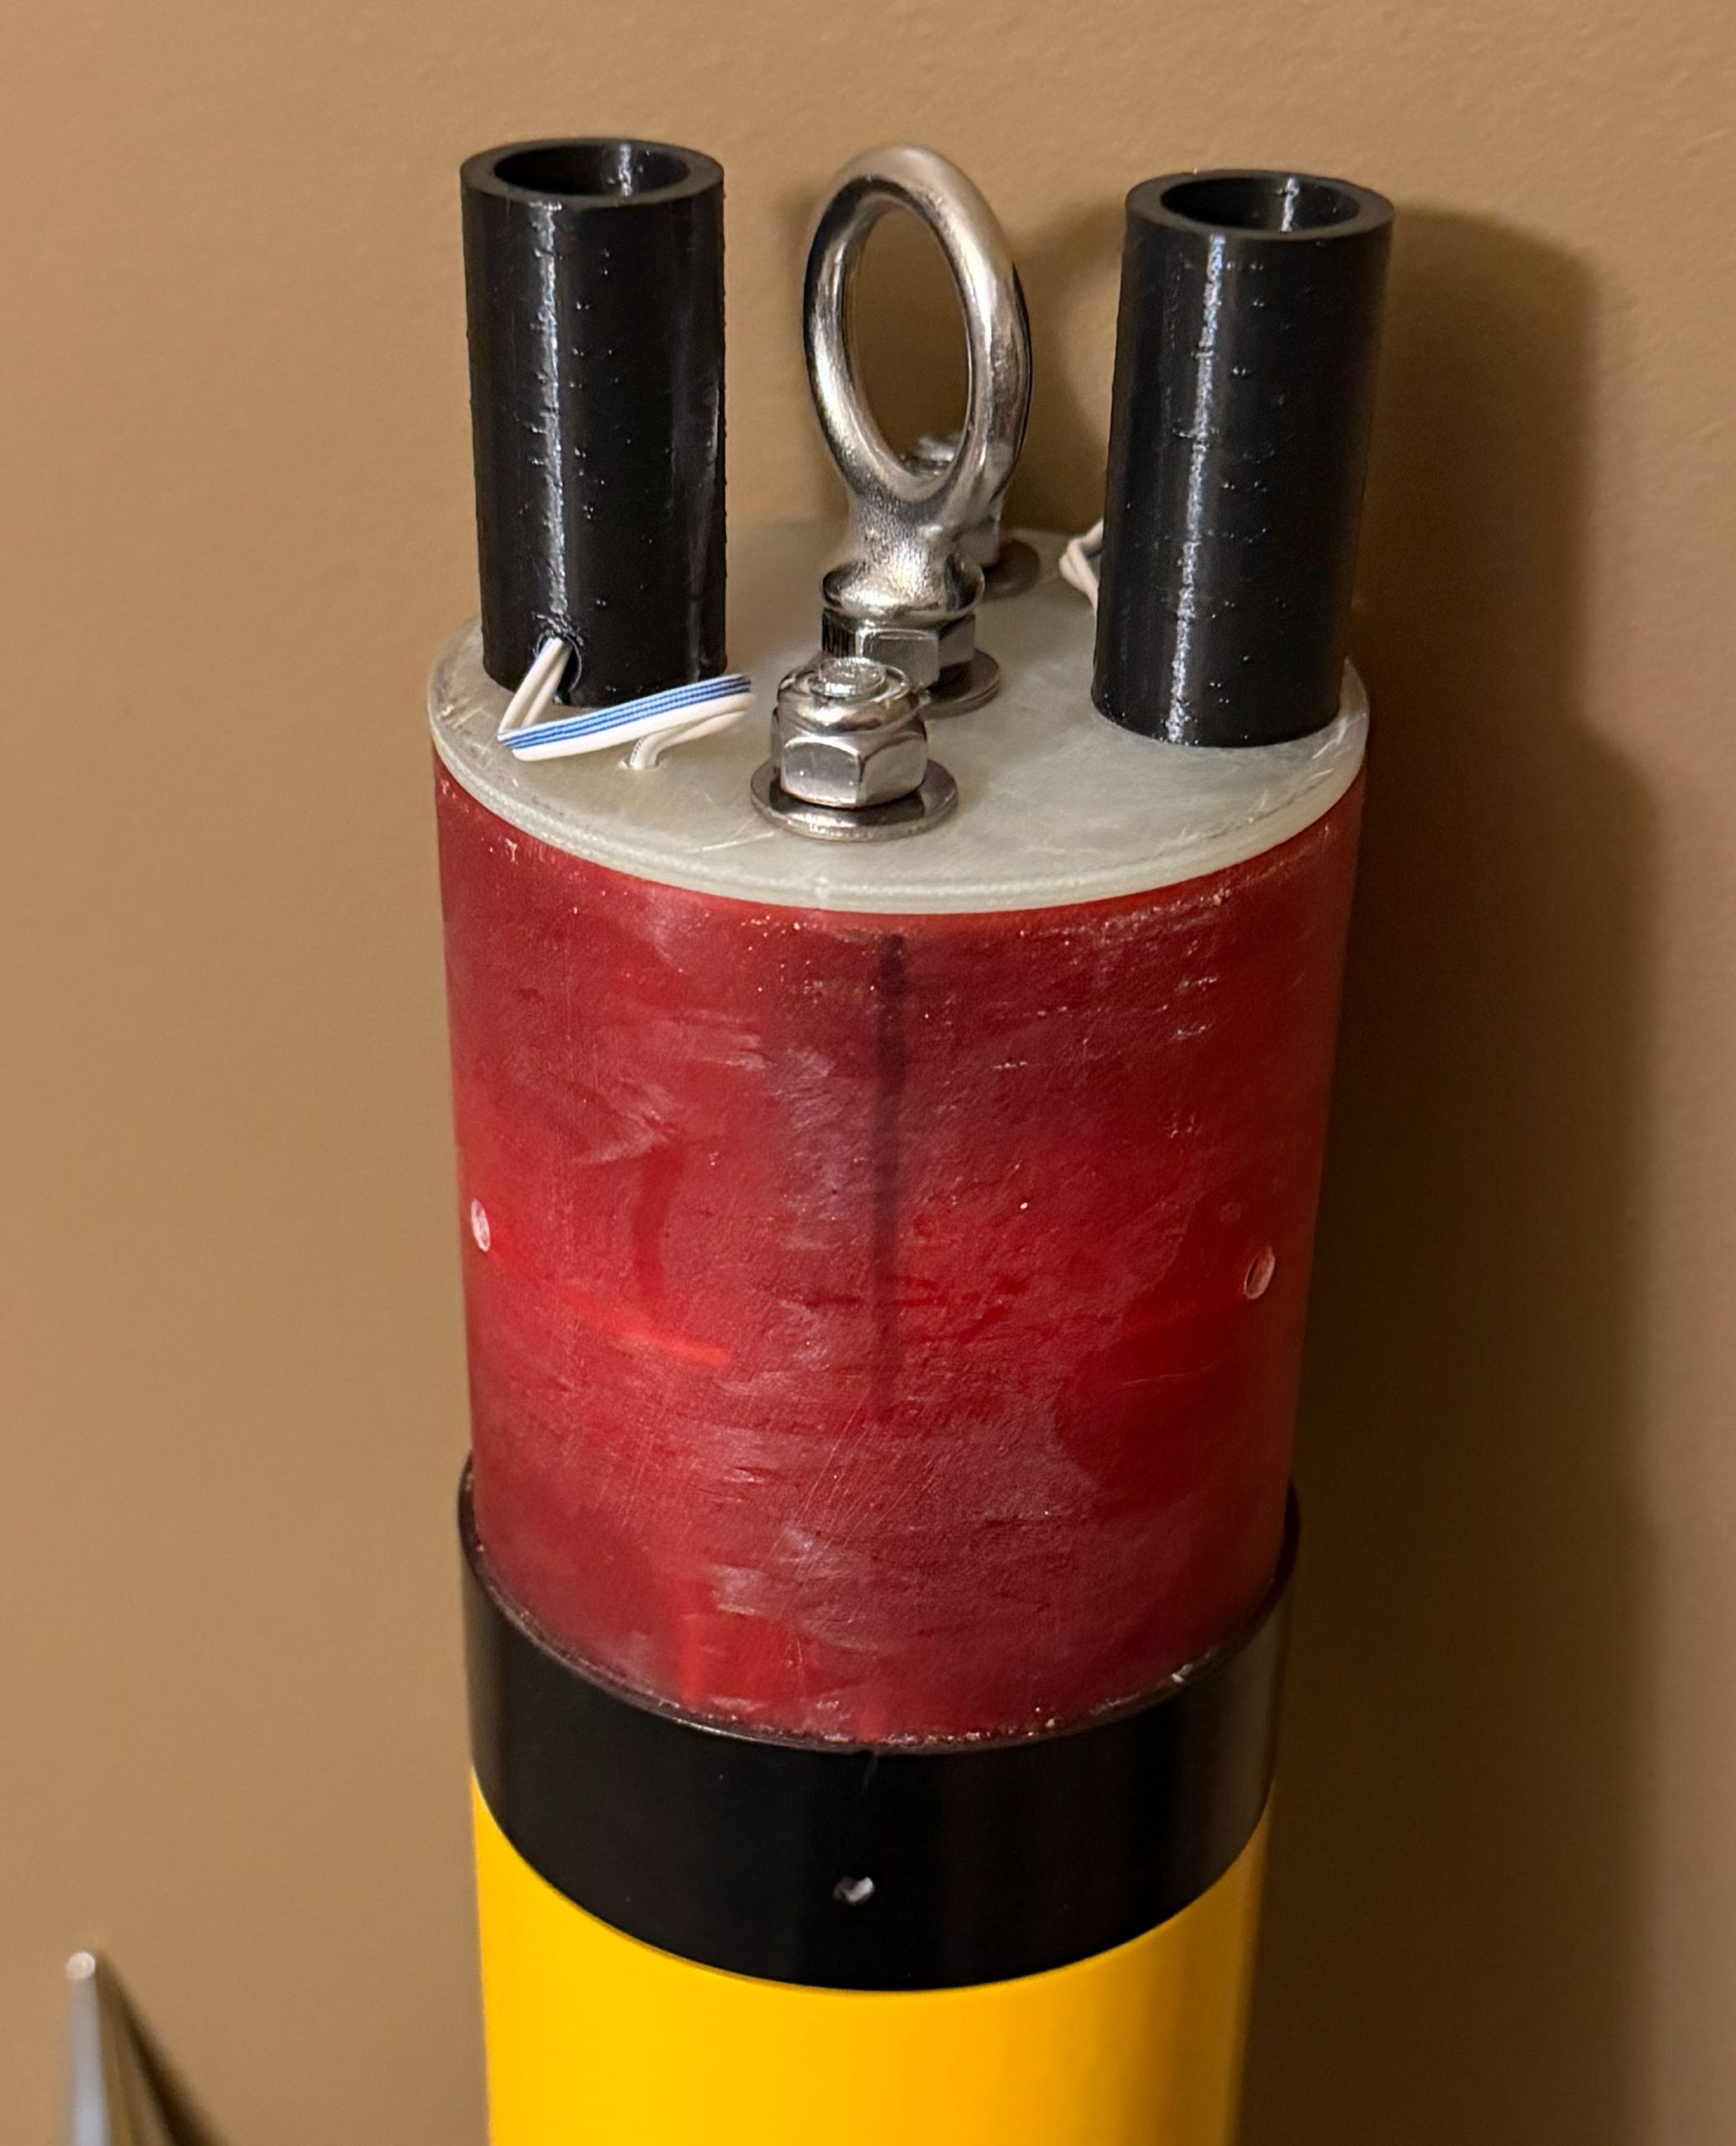
On both the fore and aft bulkheads are 3D-printed charge wells that house the black-powder charges meant to deploy the parachutes. In this case, there are two charges on each bulkhead, since we have redundant altimeters. Snaking up from the inside of the electronics bay into the charge wells are the wires for e-matches, the low-voltage incendiary devices that ignite the black-powder charges.
The first altimeter is set to fire a charge at a given point, and the backup altimeter is programmed to fire a slightly larger charge about a second later, just to make sure the chutes deploy. In the grim calculus of failure avoidance, we’d rather blow up the rocket than allow it to come down in a ballistic arc at high velocity.
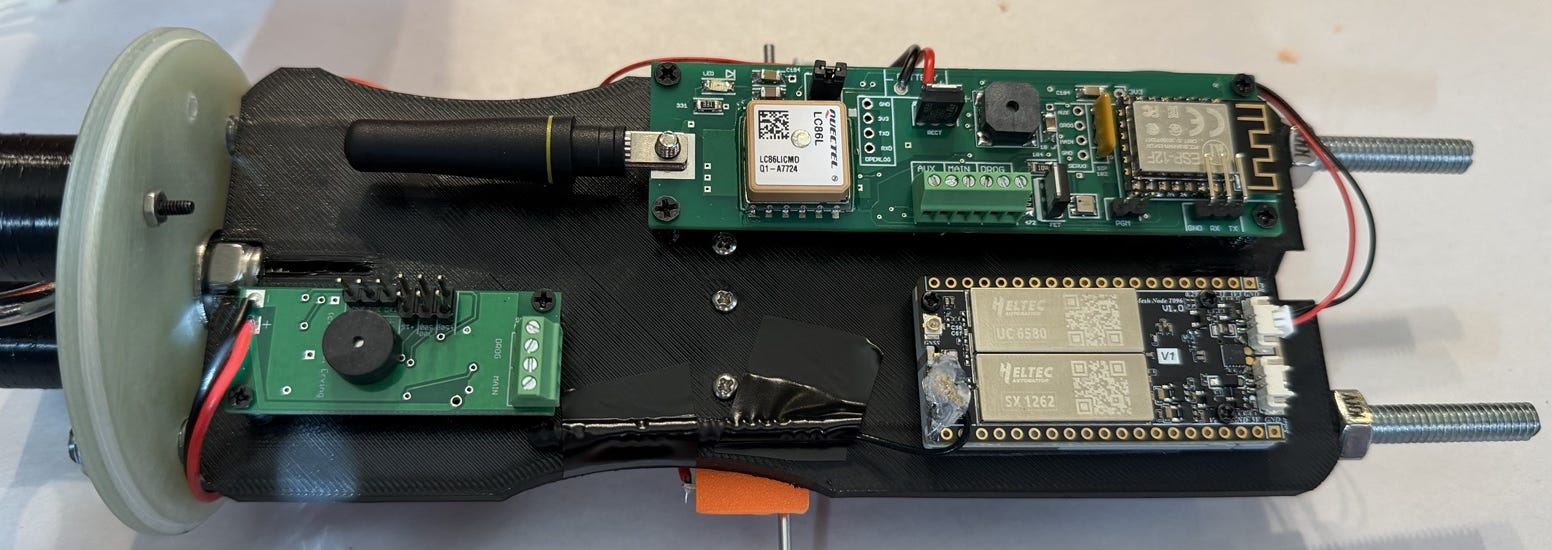
Inside are three electronic devices. The main altimeter, an Eggtimer Quasar pictured at the top above, controls the primary deployment charges. It collects telemetry data that it both stores and relays to our hand-held base station on the ground. The Quasar also has a GPS/GNSS receiver, and it sends its position data back to the base, as well.
I like Eggtimer’s altimeters generally, but they are sold as kits and require some soldering. Building a Quasar involves soldering tiny SMT components. I got through it, but I can’t recommend it as a fun way to spend an evening.
On the lower left is an Eggtimer Quark, our backup altimeter. The Quark is dead simple, programmed via jumpers on the board, and only exists to fire our two backup charges.
On the lower right is a Heltec Mesh Node T096 with Meshtastic firmware installed that I’m using as a GPS-based tracking device. Meshtastic devices combine 900 MHz-class low-power long-range radio (LoRa) transceivers with open-source firmware meant to enable a mesh-based repeater network for low-bandwidth communication. Think off-grid texting during the zombie apocalypse. There’s a whole ecosystem of Meshtastic devices and kits, and tinkering with them is a hobby in itself. Folks build nodes with big antennas and solar power, mount them up high, and cooperatively create an independent network. Kind of nifty.
This Heltec product has built-in GPS/GNSS reception, Bluetooth, and an external antenna for 900 MHz LoRa, all in a tiny package that fits easily even into small rockets.
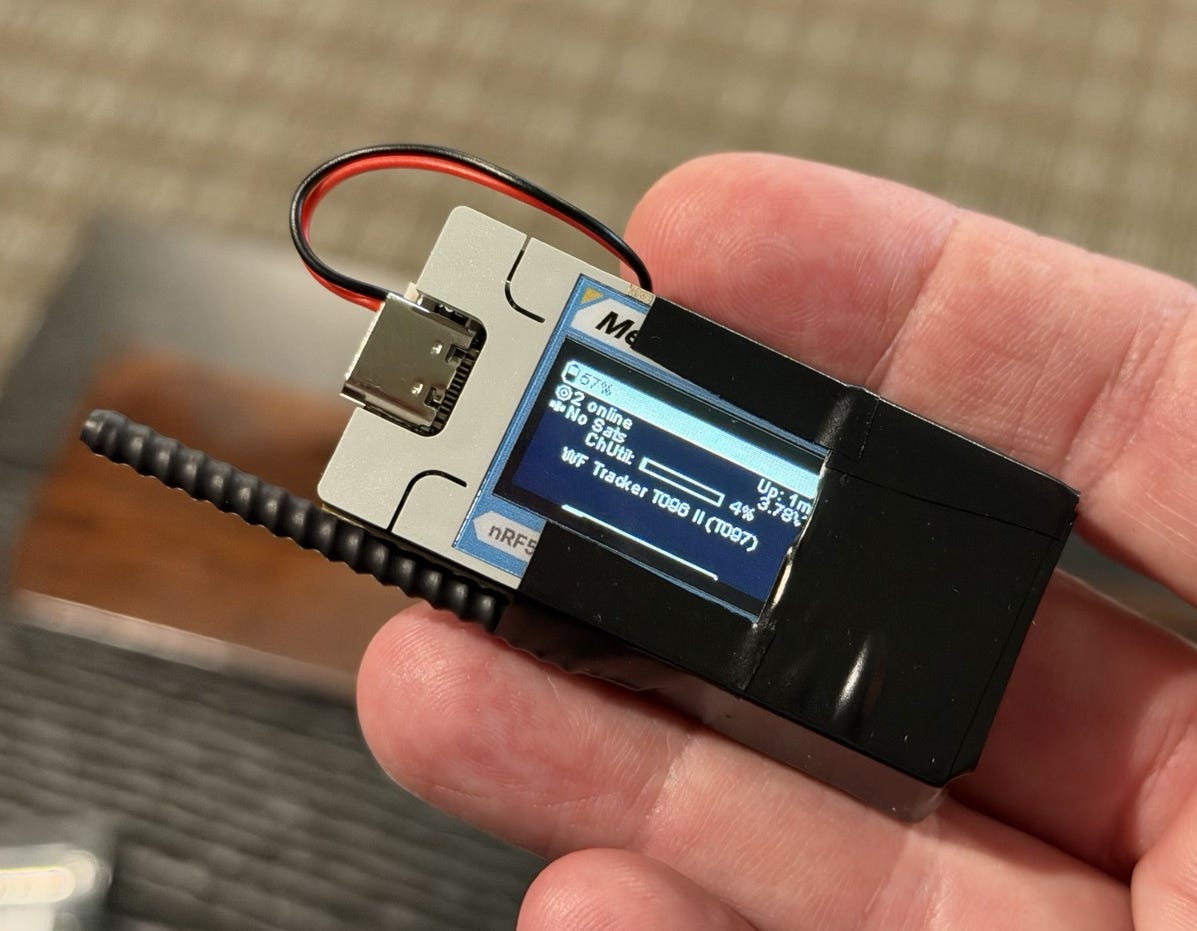
Meshtastic trackers haven’t been too widely used in amateur rocketry, but we’ve found them to be quite effective when configured properly. We have another node that we use as a base; it connects to a phone via Bluetooth and shows info in the Meshtastic app. The range for 900 MHz LoRa is quite good with line of sight, and you almost always have that when a rocket is in the sky. Even if it’s hidden over a ridge when it has landed, you can just go to the last known position, and you should be close. If worst comes to worst, any other Meshtastic nodes in the area—or on a nearby rocket in the sky—can act as a repeater to send packets containing position info back to the base.
Also, notably, we can get a tracker and battery setup for under 50 bucks, which is way less than most custom rocket-tracking solutions. Given how many tracking devices we’ve sacrificed to, uh, kinetic events involving a rocket meeting the ground, there’s an appeal to affordable solutions.
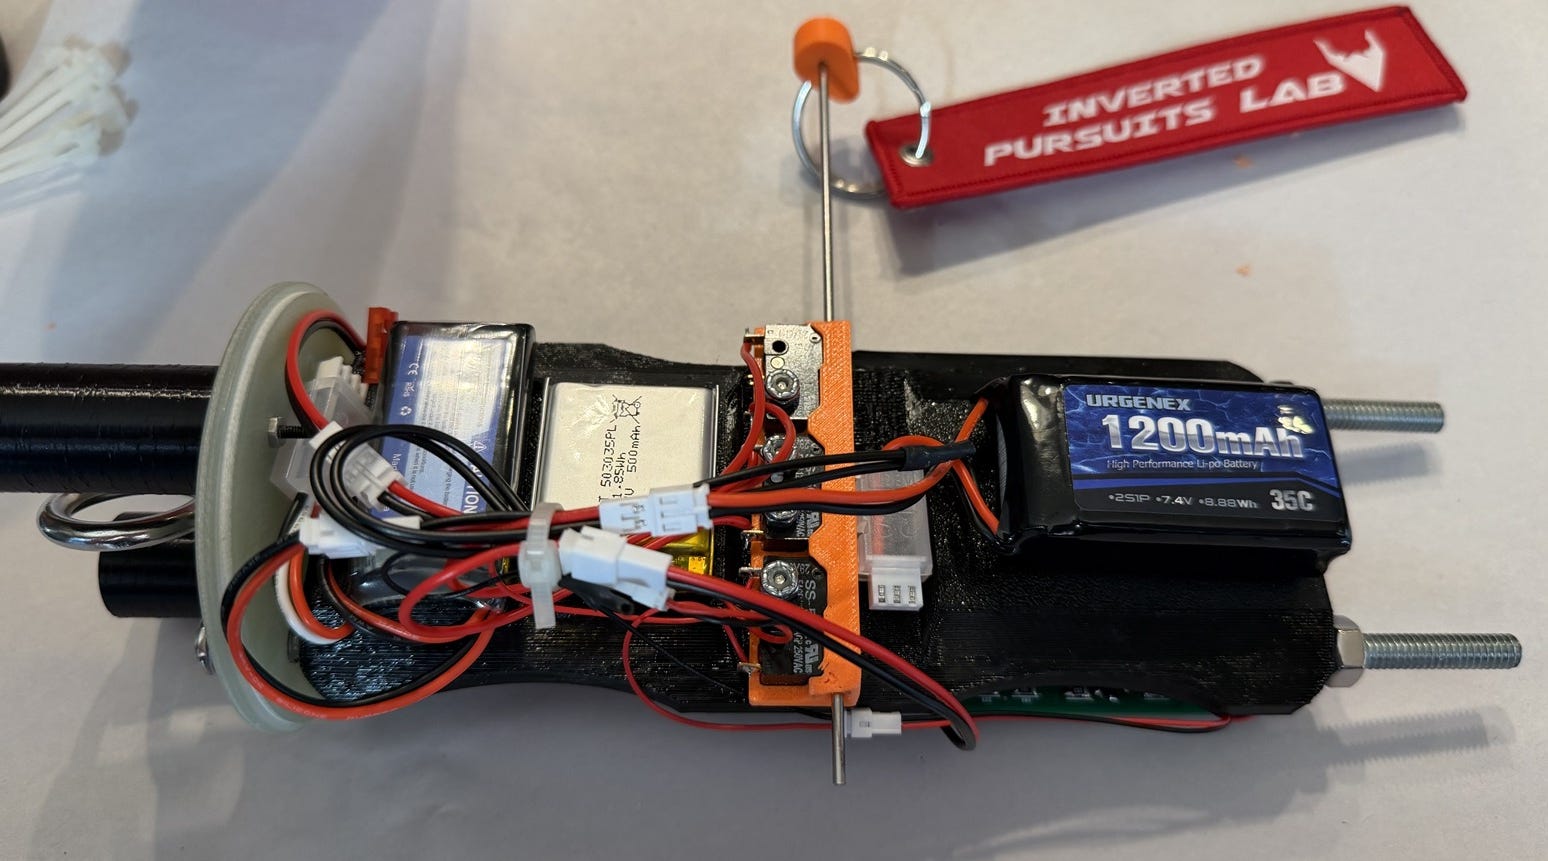
On the underside of the sled in the avionics bay are the LiPo batteries for the three devices plus an orange pull-pin switch. The purpose of this switch is to allow us to arm the rocket’s electronics—and their black-powder charges—right before the flight. When the pin is inserted in the switch, no power flows to the electronics. When it’s pulled out, everything lights up. This arrangement prevents inadvertent firing of deployment charges when a rocket is being safety inspected or getting mounted on a launch rail.
Setbacks and successes
Both my son and I got our fiberglass rockets built and ready for this year’s AirFest. I’d like to say that we took the rockets out to the launch site, had no issues, and flew them. With projects this complicated, though, that’s never how it happens.
We hit a few notable snags along the way.
The first has to do with those black-powder charges. For our prior rockets, we used a black-powder substitute that’s easier to source and to clean up, but it requires really good containment in order to, uhh, explode well. This issue can be exacerbated by the lower atmospheric pressure at high altitudes. Black powder is better on this front, so it is almost exclusively used in amateur rocketry. We also needed to figure out the correct amount of black powder—or substitute—to use in our rockets’ four charge wells. None of these issues are insurmountable or even terribly difficult, but several days before AirFest, we had not worked out the sizing and were not in possession of any real black powder, nor did we have a confirmed place to buy it.
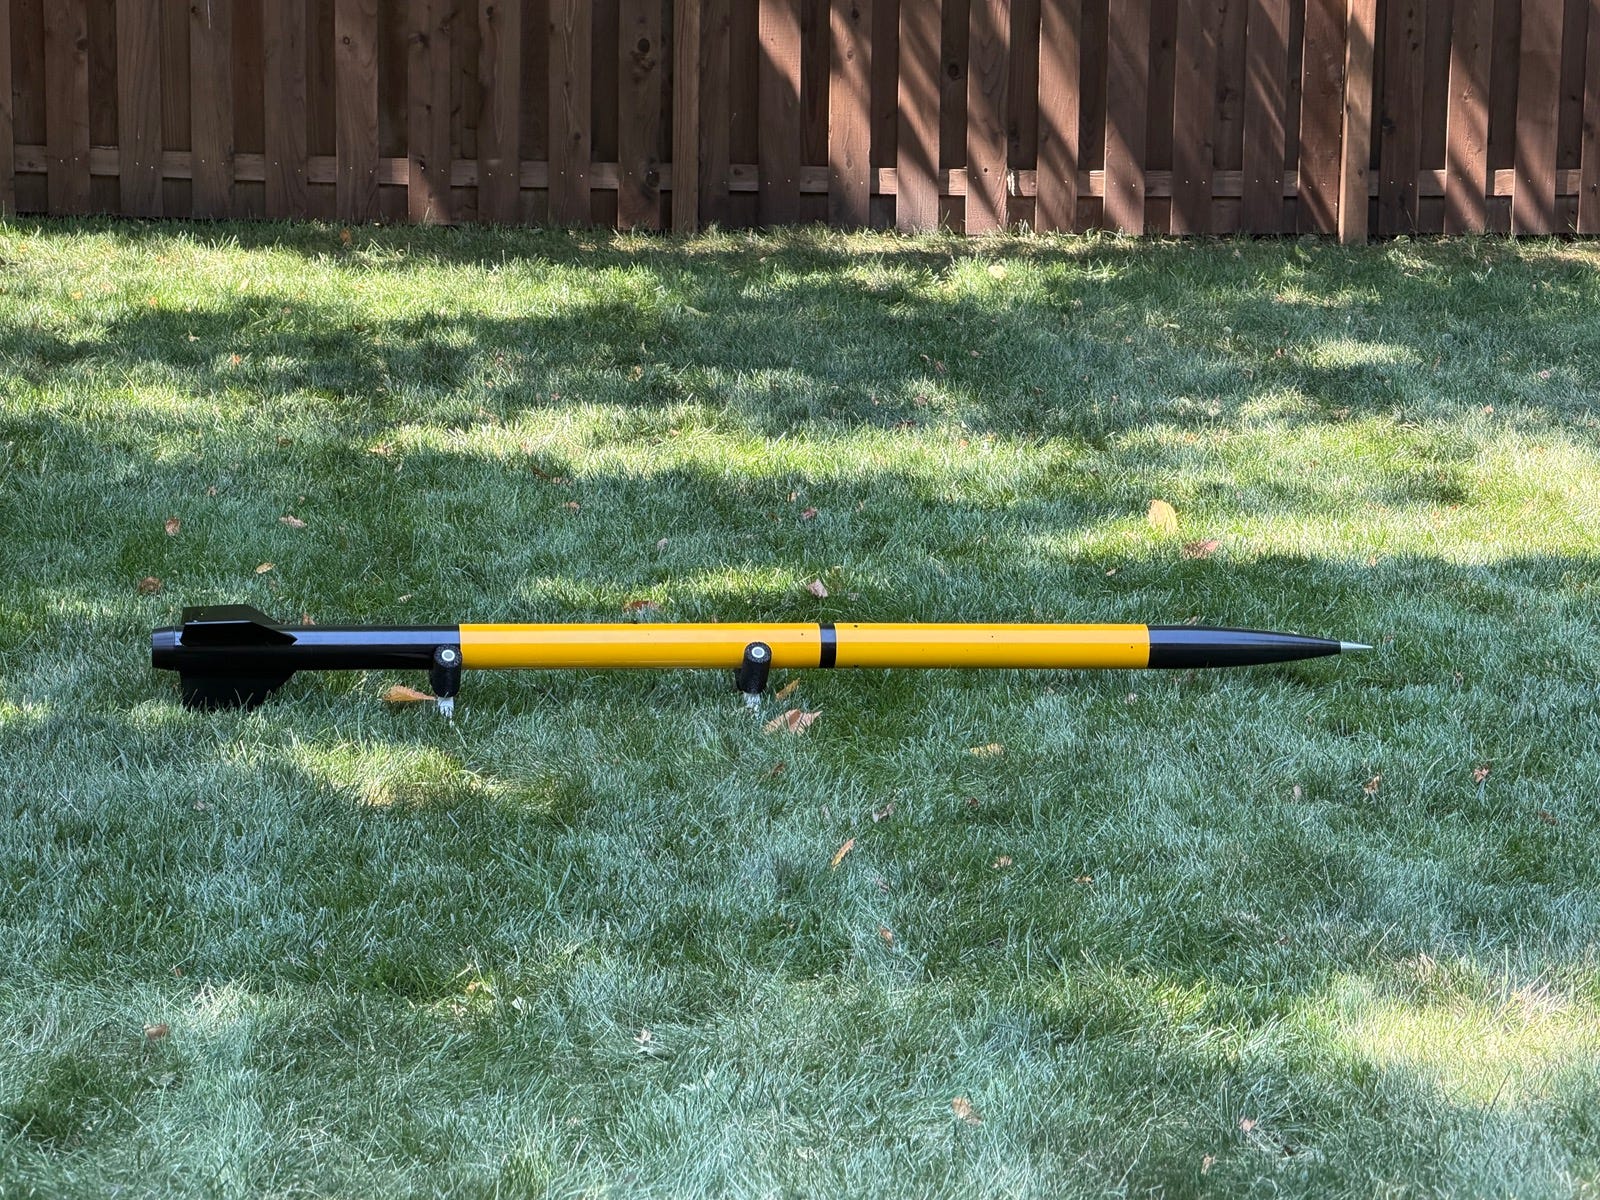
In the end, we tracked down some real black powder from a vendor at AirFest and wound up conducting our final ground-based deployment tests—basically test-firing the charges to make sure the rocket separates—on the range out at the rocket pasture.
This setup led to a scene where we attempted a test with ~1.5 grams of powder, the rocket did not separate, and Tim Lehr—the Wildman of Wildman Rocketry—was watching. He immediately asked us how much powder we used and told us to double it. “I built that rocket. I know what it can take.” No point in arguing with the Wildman, we quickly decided, and that advice helped us finalize our charge setups.
Our plan was for my son to fly his fiberglass rocket first, and then I’d fly mine after that. The first flight for each rocket would be on the smaller K motor, and if that went well, we’d move up to the L1000W.
When we put my son’s rocket up on the rail for its first flight and pulled out the pin to turn on the electronics, though, things got wonky. The telemetry readings coming from our handheld base seemed very much off. It was reporting high altitudes while the rocket was sitting stationary on the launch pad. We turned everything off, took the rocket off the rack, fiddled with some settings to make sure the base wasn’t getting readings from someone else’s rocket, and tried it all again. This time, the altimeter wound up firing the charge for the drogue deployment while the rocket was sitting on the rail.
Which is not ideal.
Near as I can tell, the problem was a bad altimeter or pressure sensor. We are still working with the Eggtimer folks on a post-mortem.
Our solution was to swap out the Eggtimer Quantum in my son’s rocket for the one from my rocket. That altimeter worked as expected, and…
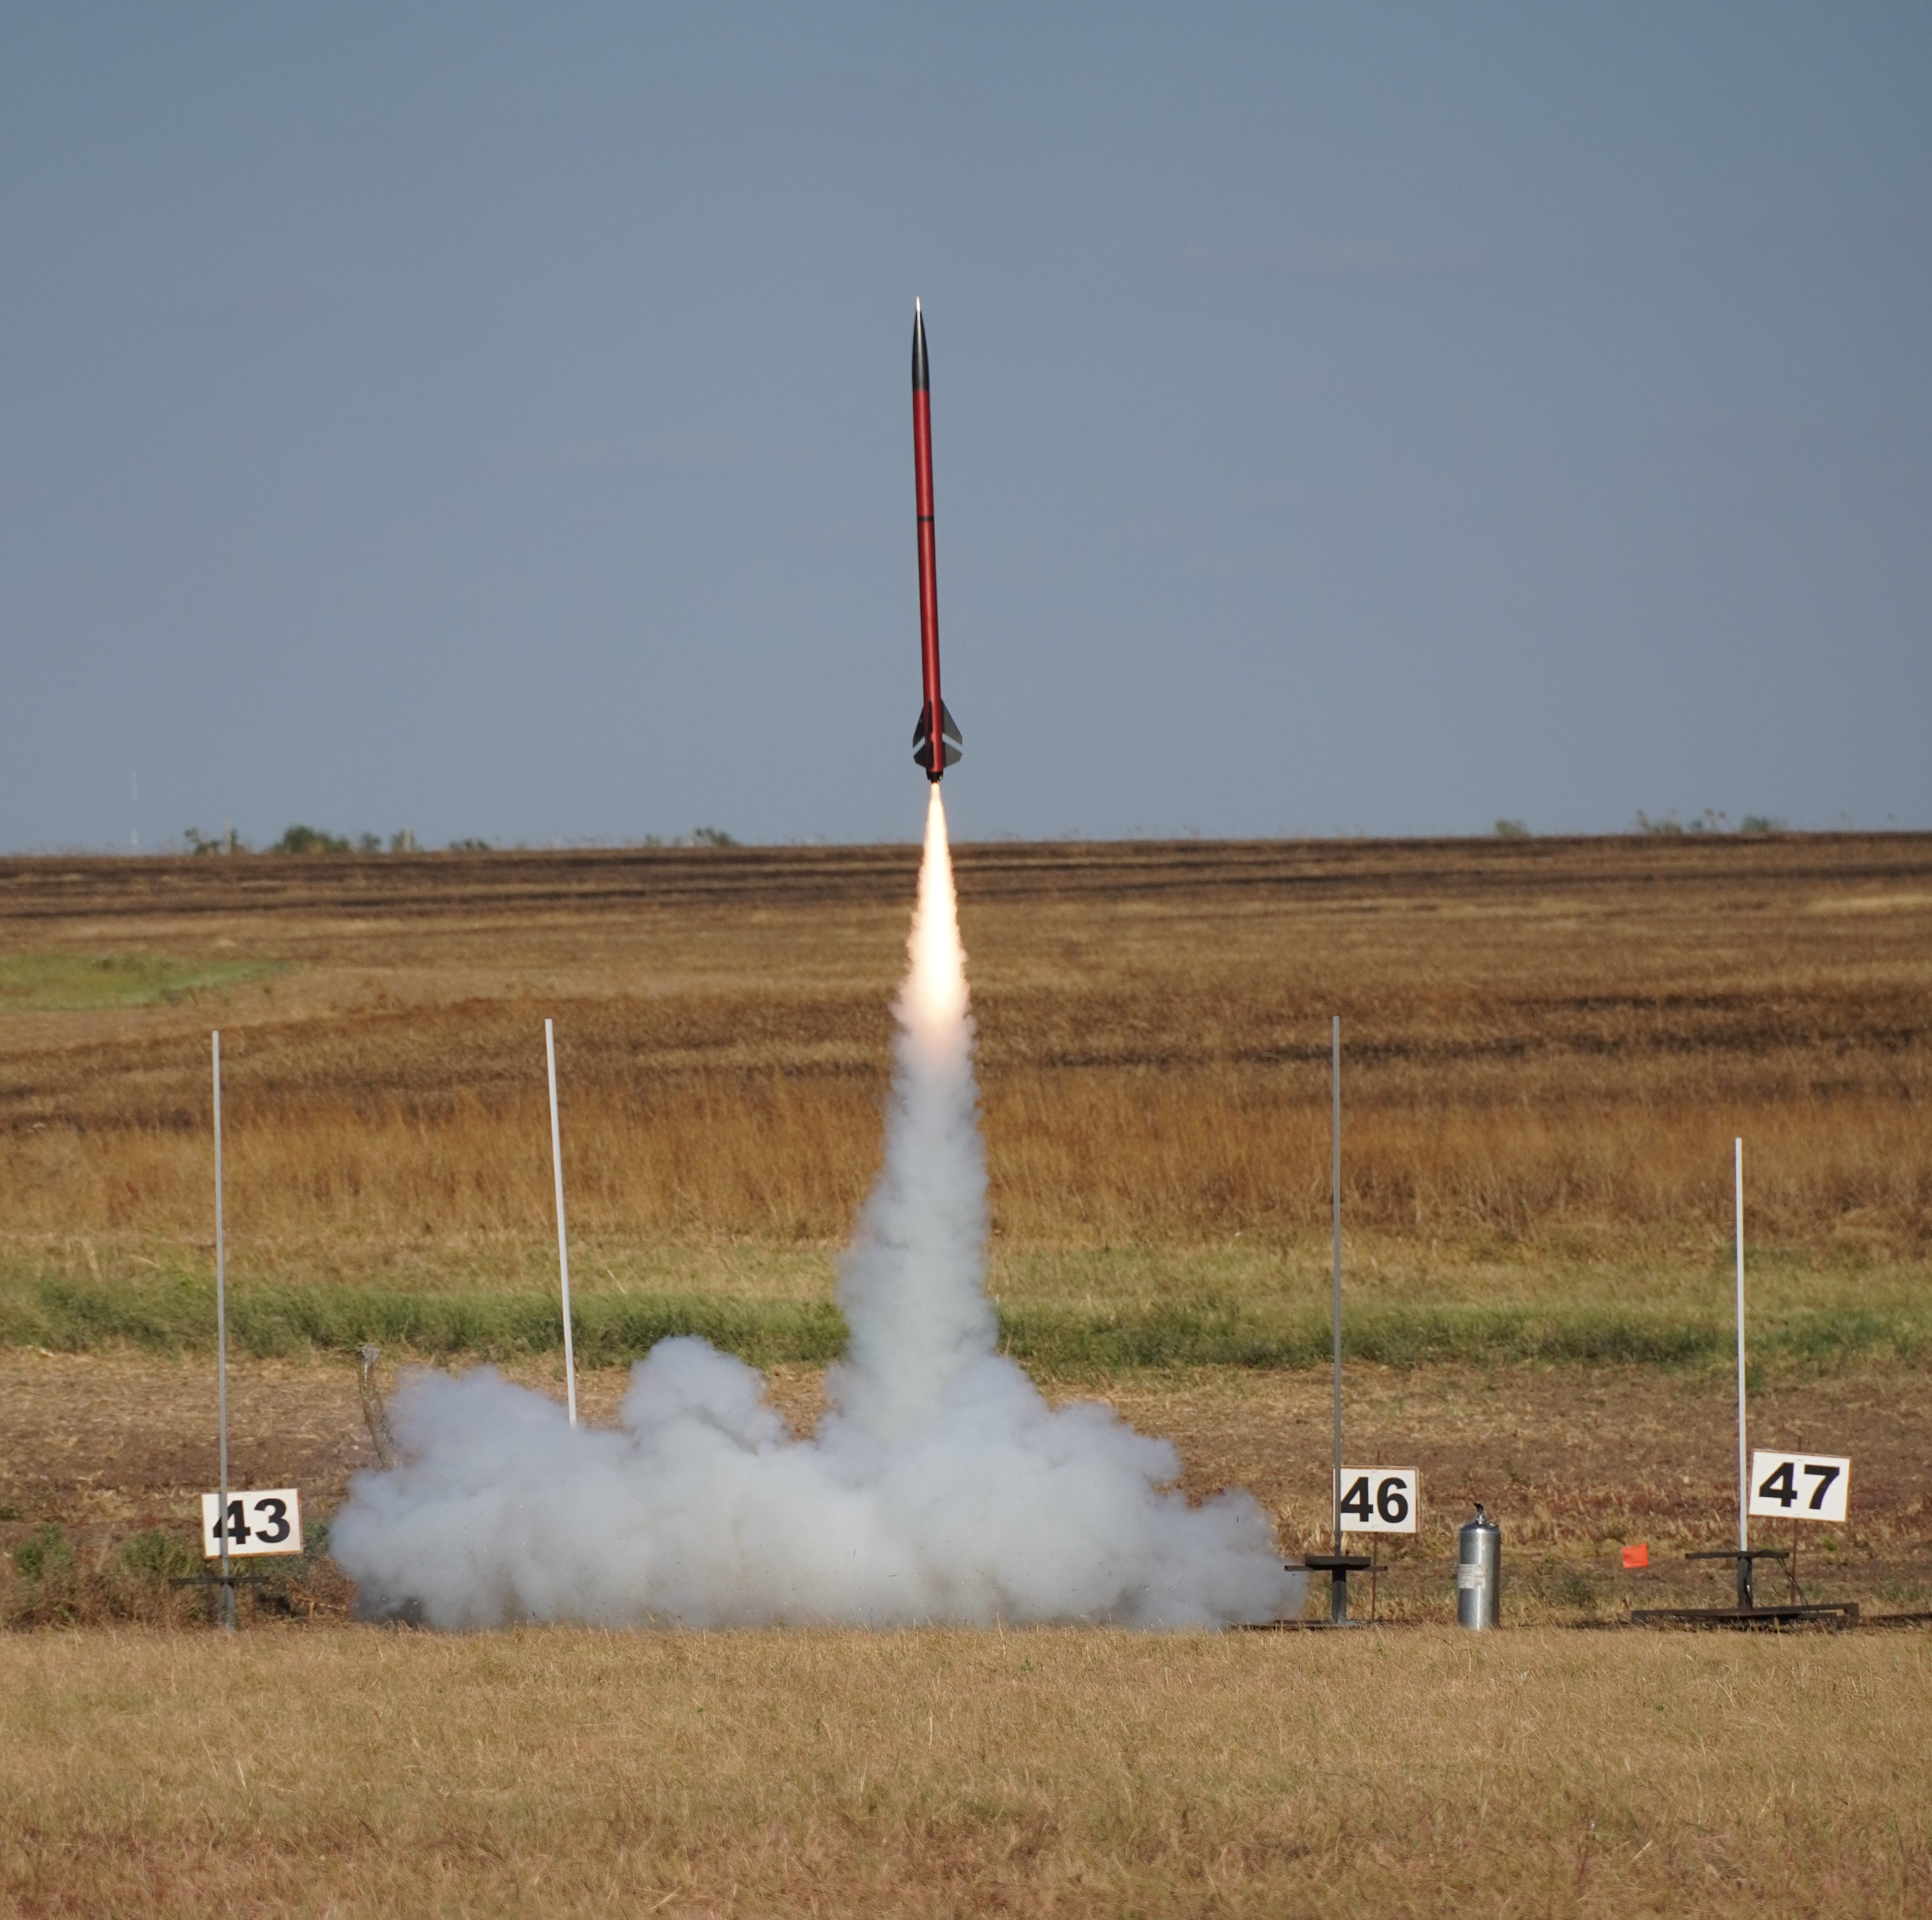
His rocket flew to around 6,400 feet above ground level on the K motor. The whole flight couldn’t have gone much better. The parachutes deployed as planned, and we recovered the rocket in a nearby field, intact and ready to be flown again.
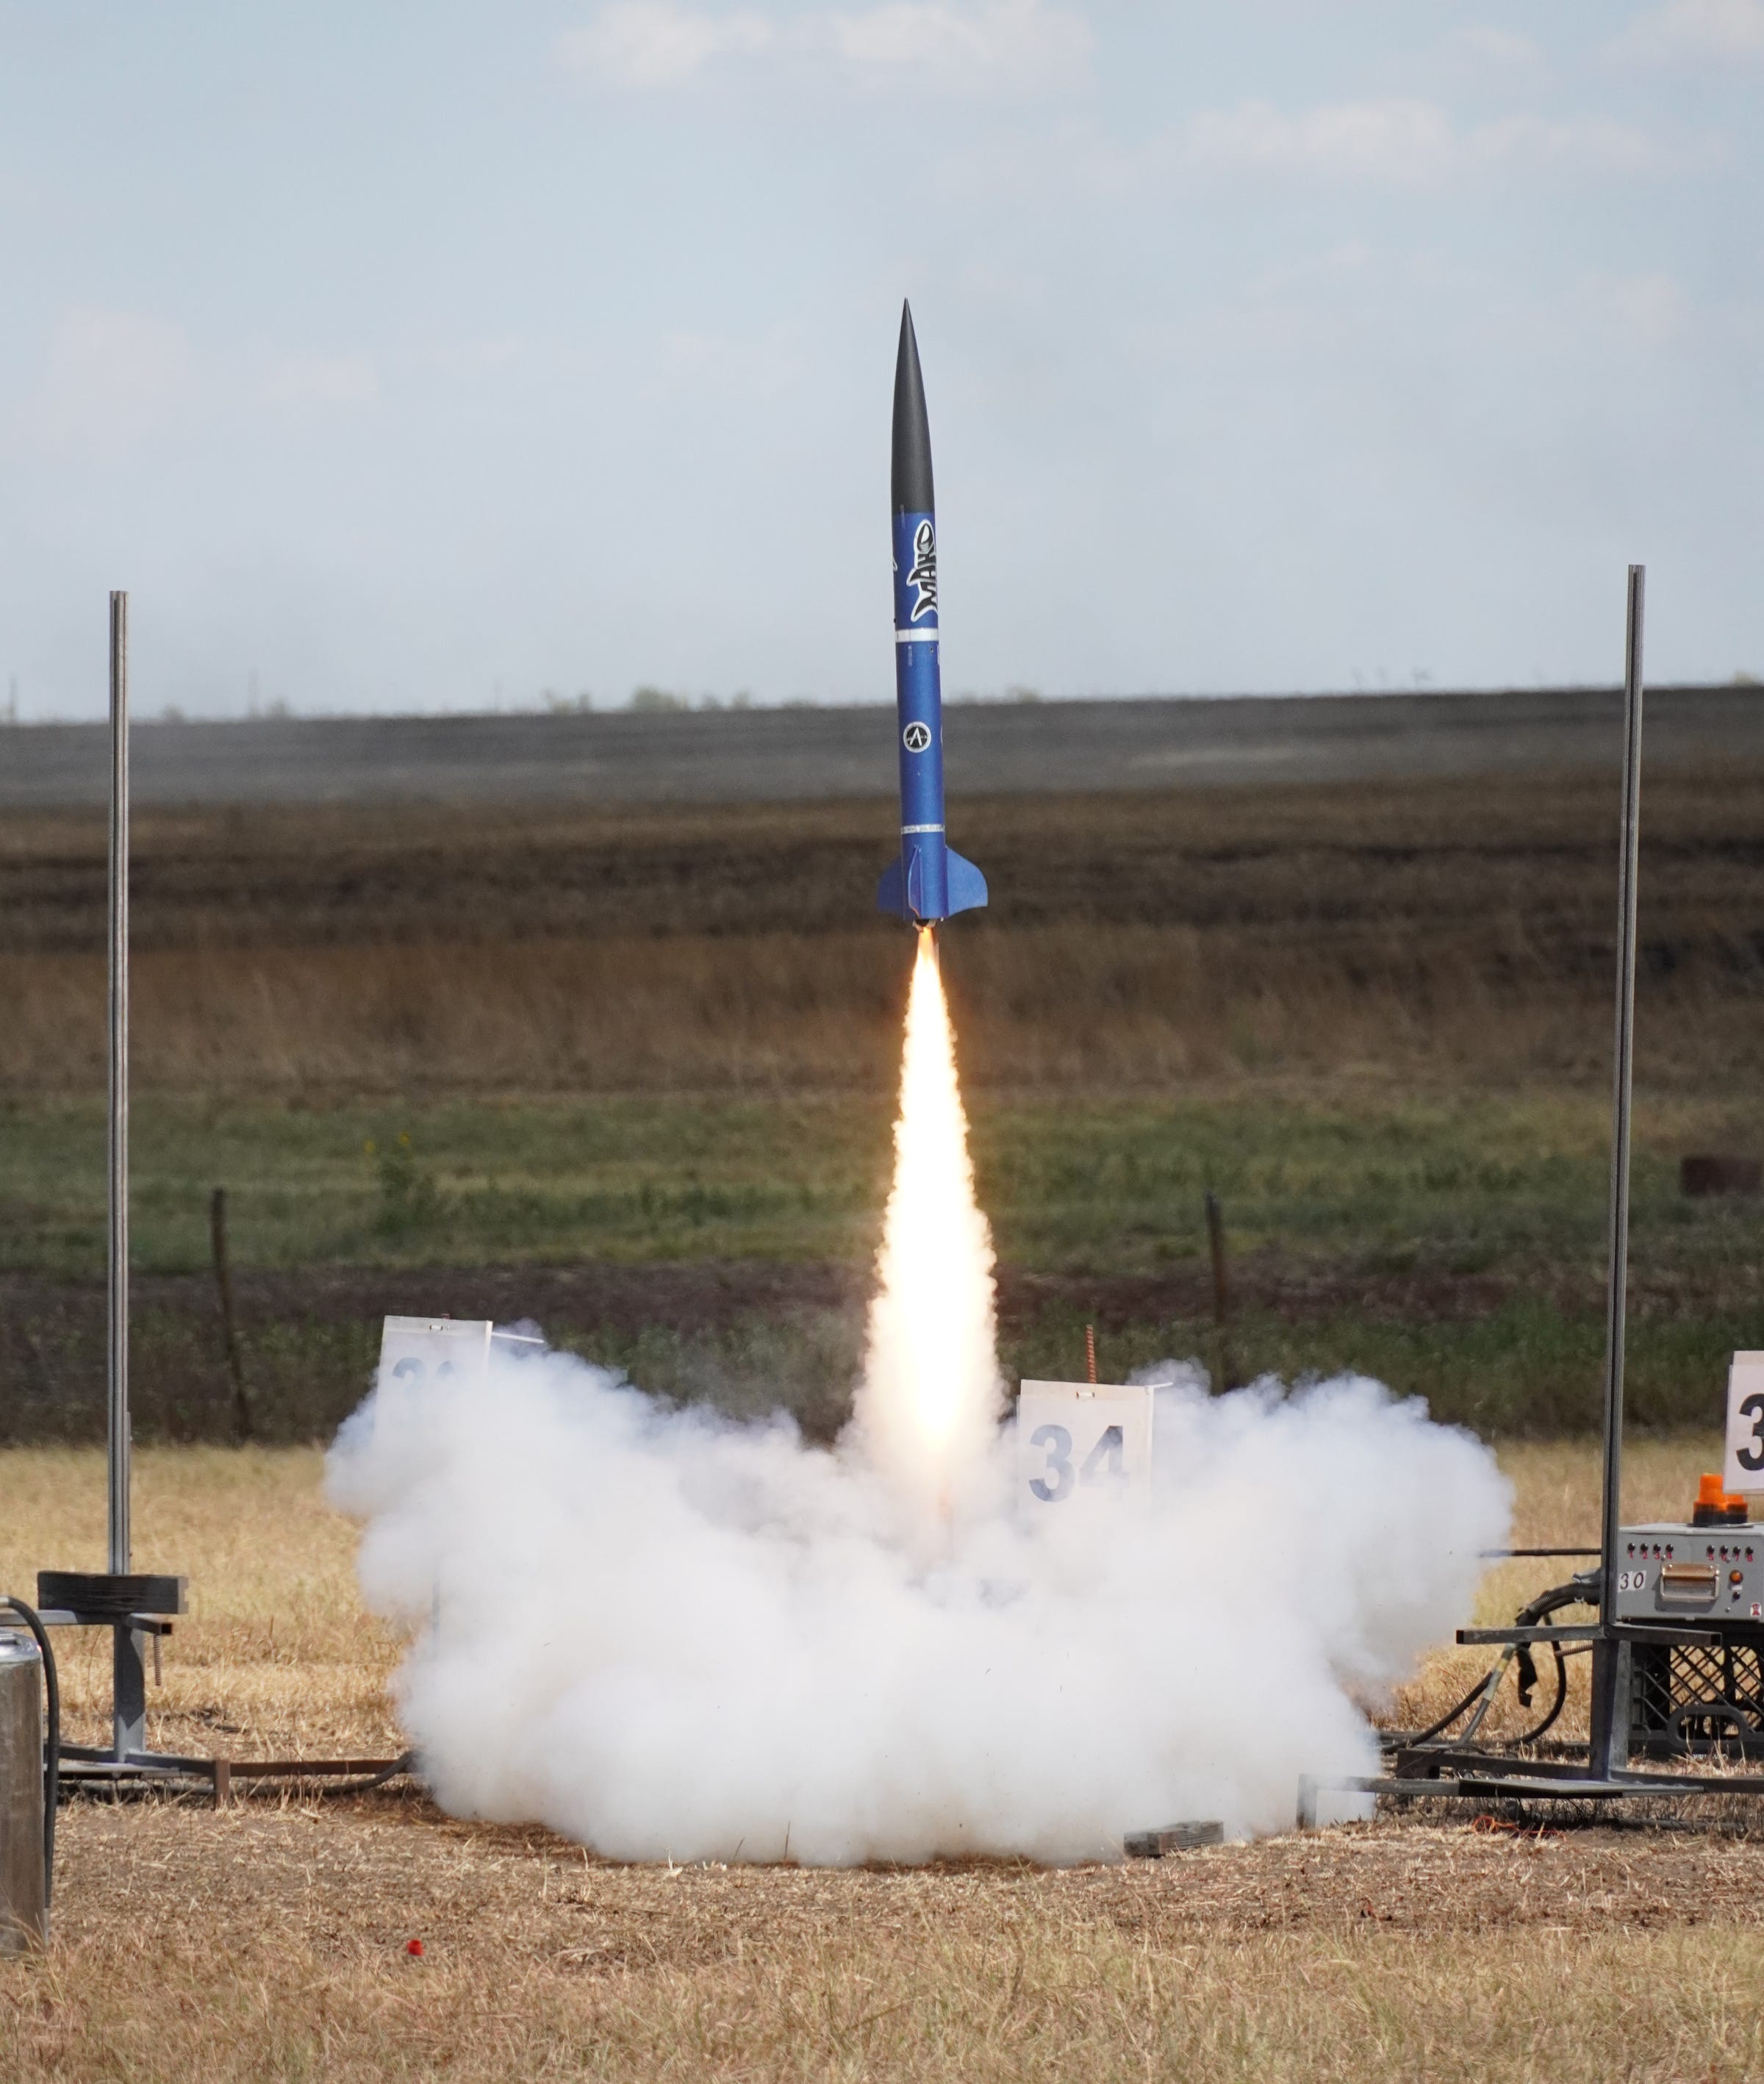
My youngest son also successfully flew his first rocket with electronic dual deployment on an H motor that day. It’s basically a smaller version of our rockets made out of cardboard with a similar altimeter-based deployment setup.
That afternoon, though, I found a problem with my rocket that killed my chances of flying: the pull-pin switch had failed. I could slide the pin into the mechanism, but the switches would not turn off the power to the altimeters. A key piece of safety equipment on the rocket wasn’t working.
I bought this switch from a vendor known as Inverted Pursuits, and happily, they had a booth at AirFest. (Rocketry is a small world, and AirFest is a big event.) I took the switch over and explained the problem. The guy at the booth basically said “my bad” and gave me a replacement. That evening, I set up my soldering equipment in our AirBnB and soldered in a new switch.
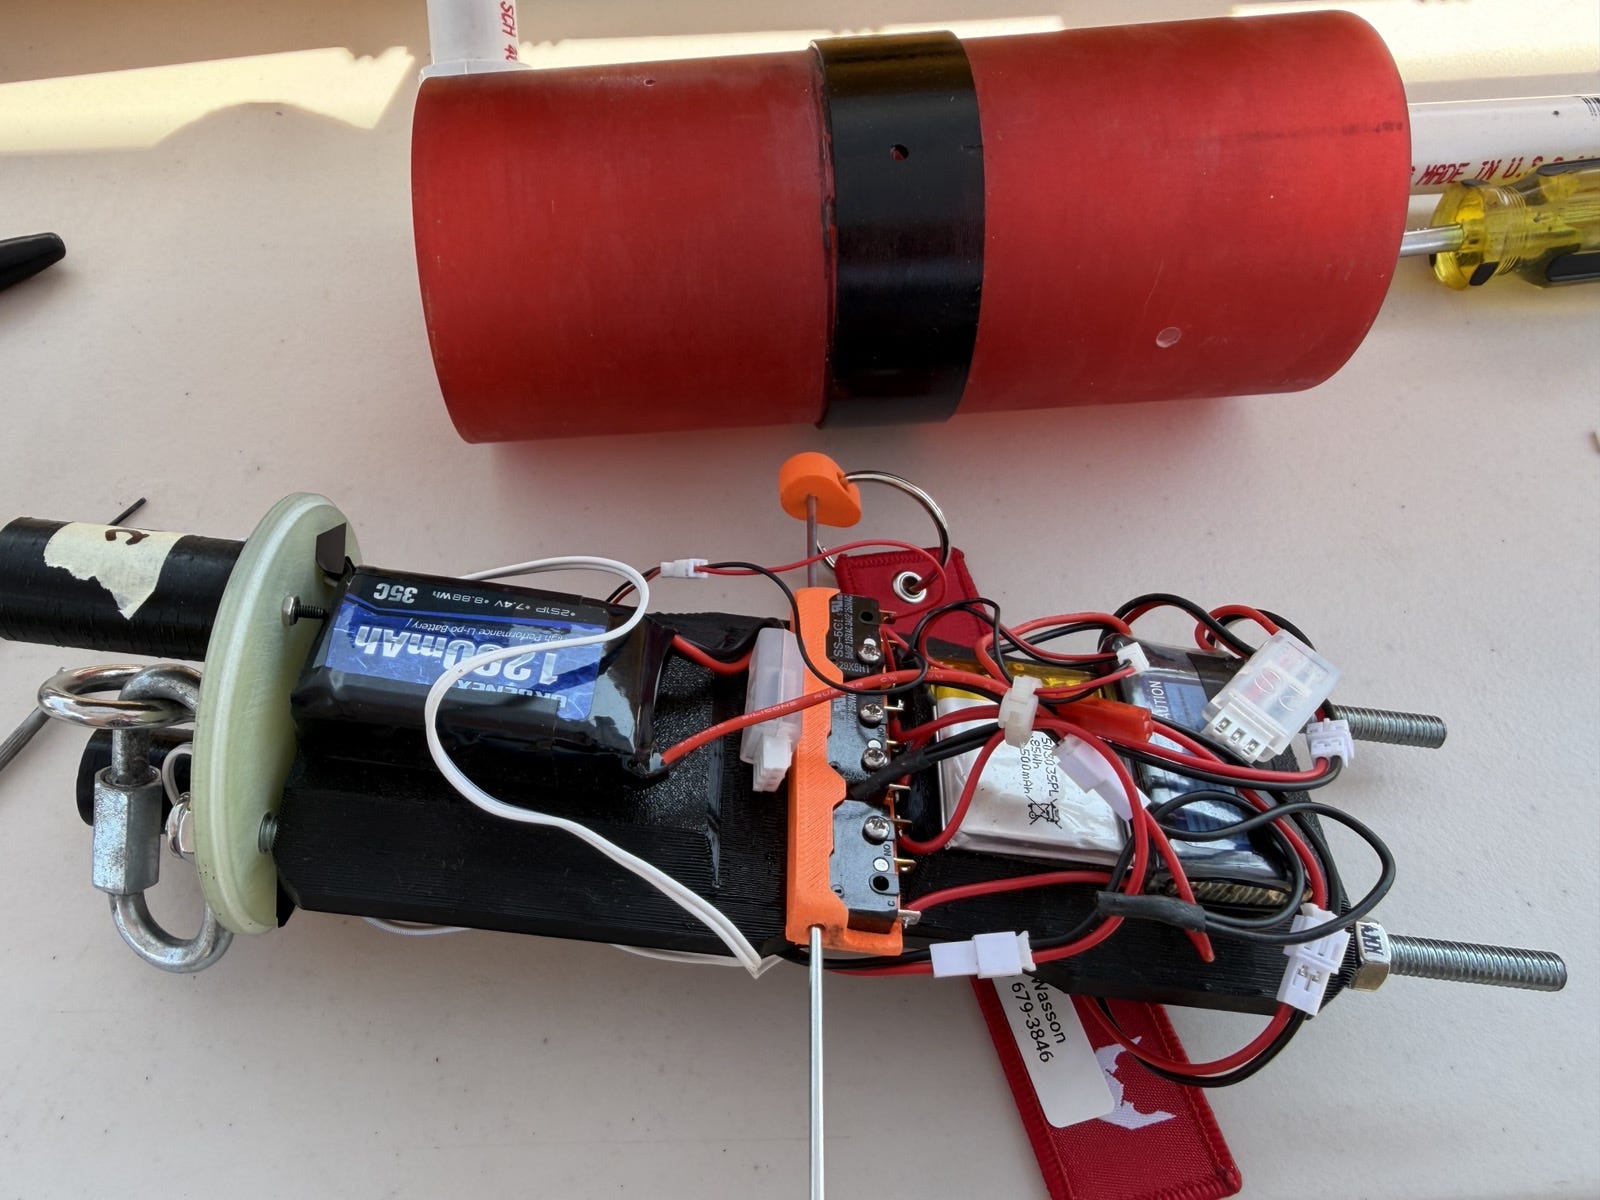
The next day, when it came time for my son to fly his fiberglass rocket on the L motor, we discovered that his identical pull-pin switch failed just like mine had. The fix was for my rocket to donate the full guts of its avionics bay to my son’s rocket for its second flight.
We quickly swapped the avionics sled in, and his rocket flew to 11,000 feet. Again, the whole flight went well, including deployment and recovery. My younger son also flew his dual-deploy rocket again, on a larger I motor to 3,700 feet, and we successfully recovered it.
By then, as you might imagine, I was incredibly proud of what my sons had accomplished at ages 17 and 14. Whatever else happened, our AirFest ‘26 projects were a resounding success.
My turn
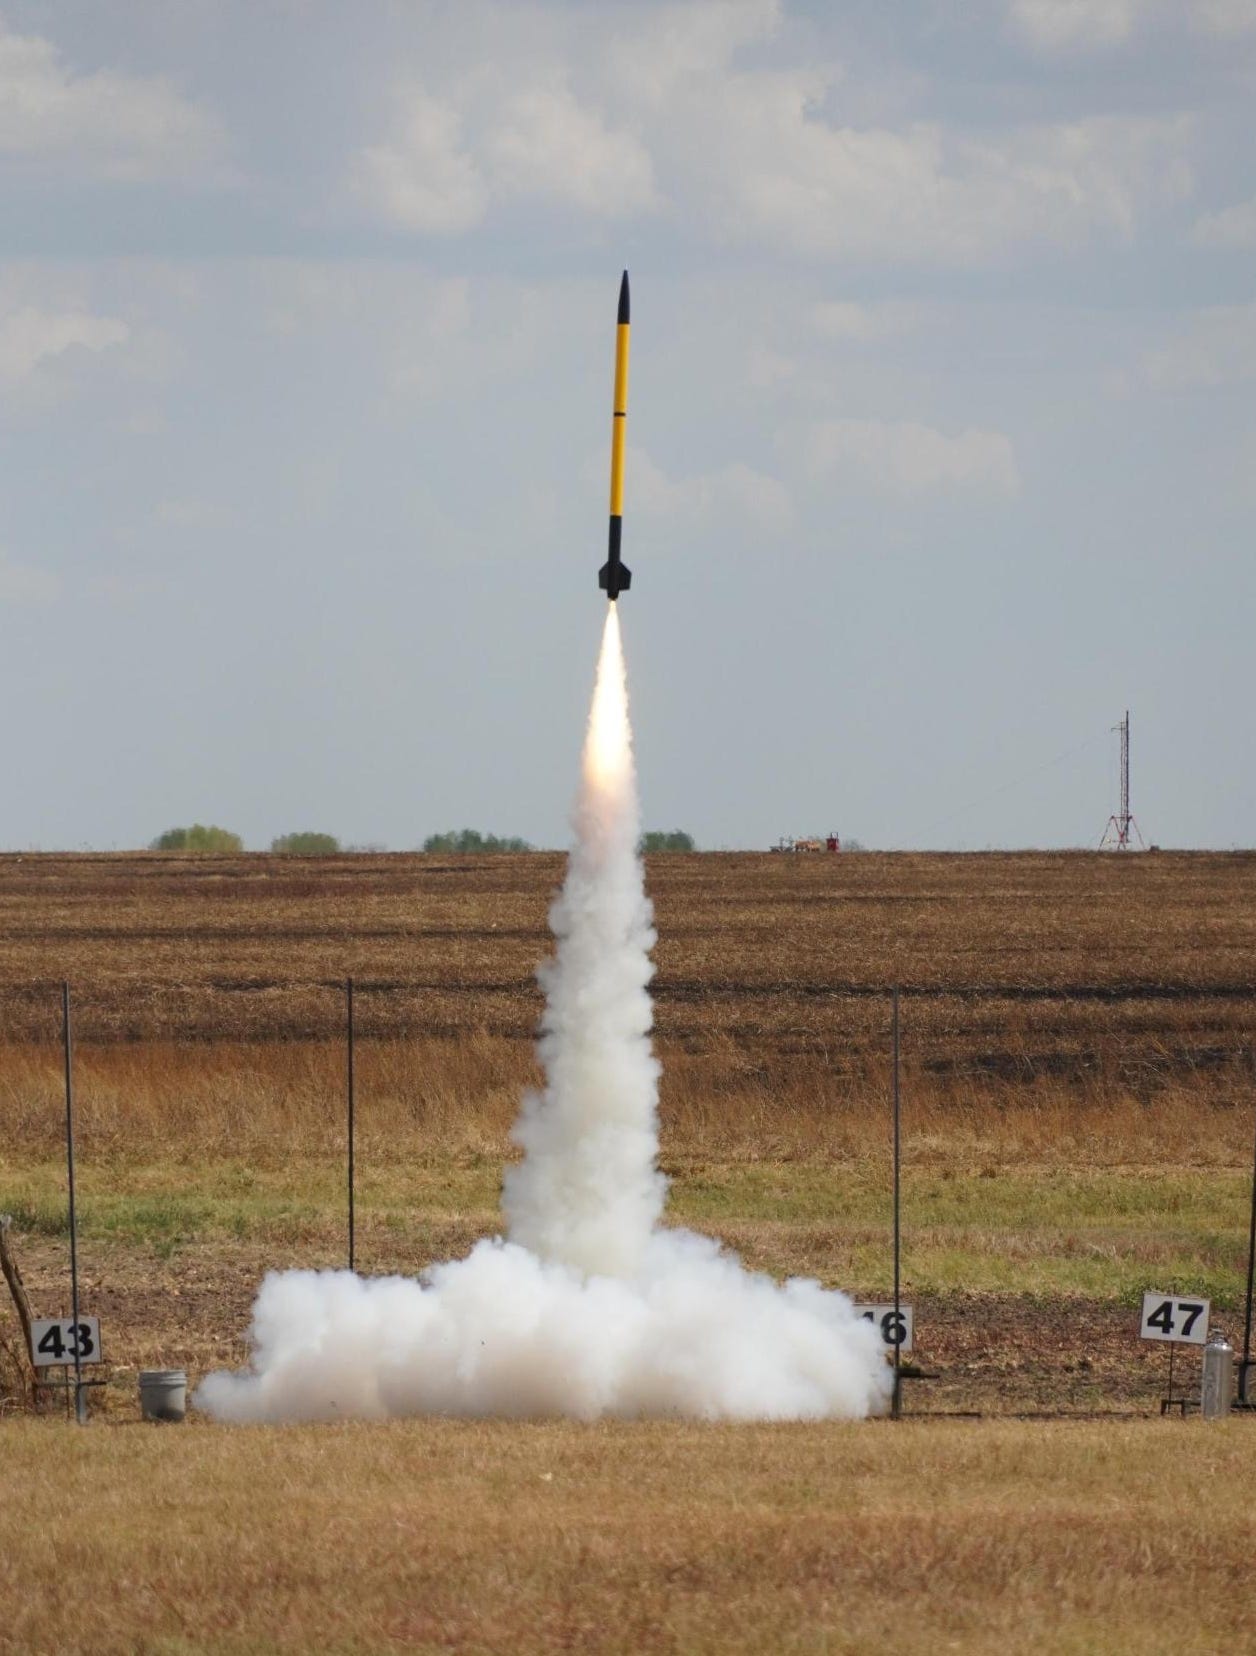
Still, I get a kick out of flying my own rockets, and on day three, I finally got to launch my rocket on the K motor. Here’s how that looked:
And a video of the launch:
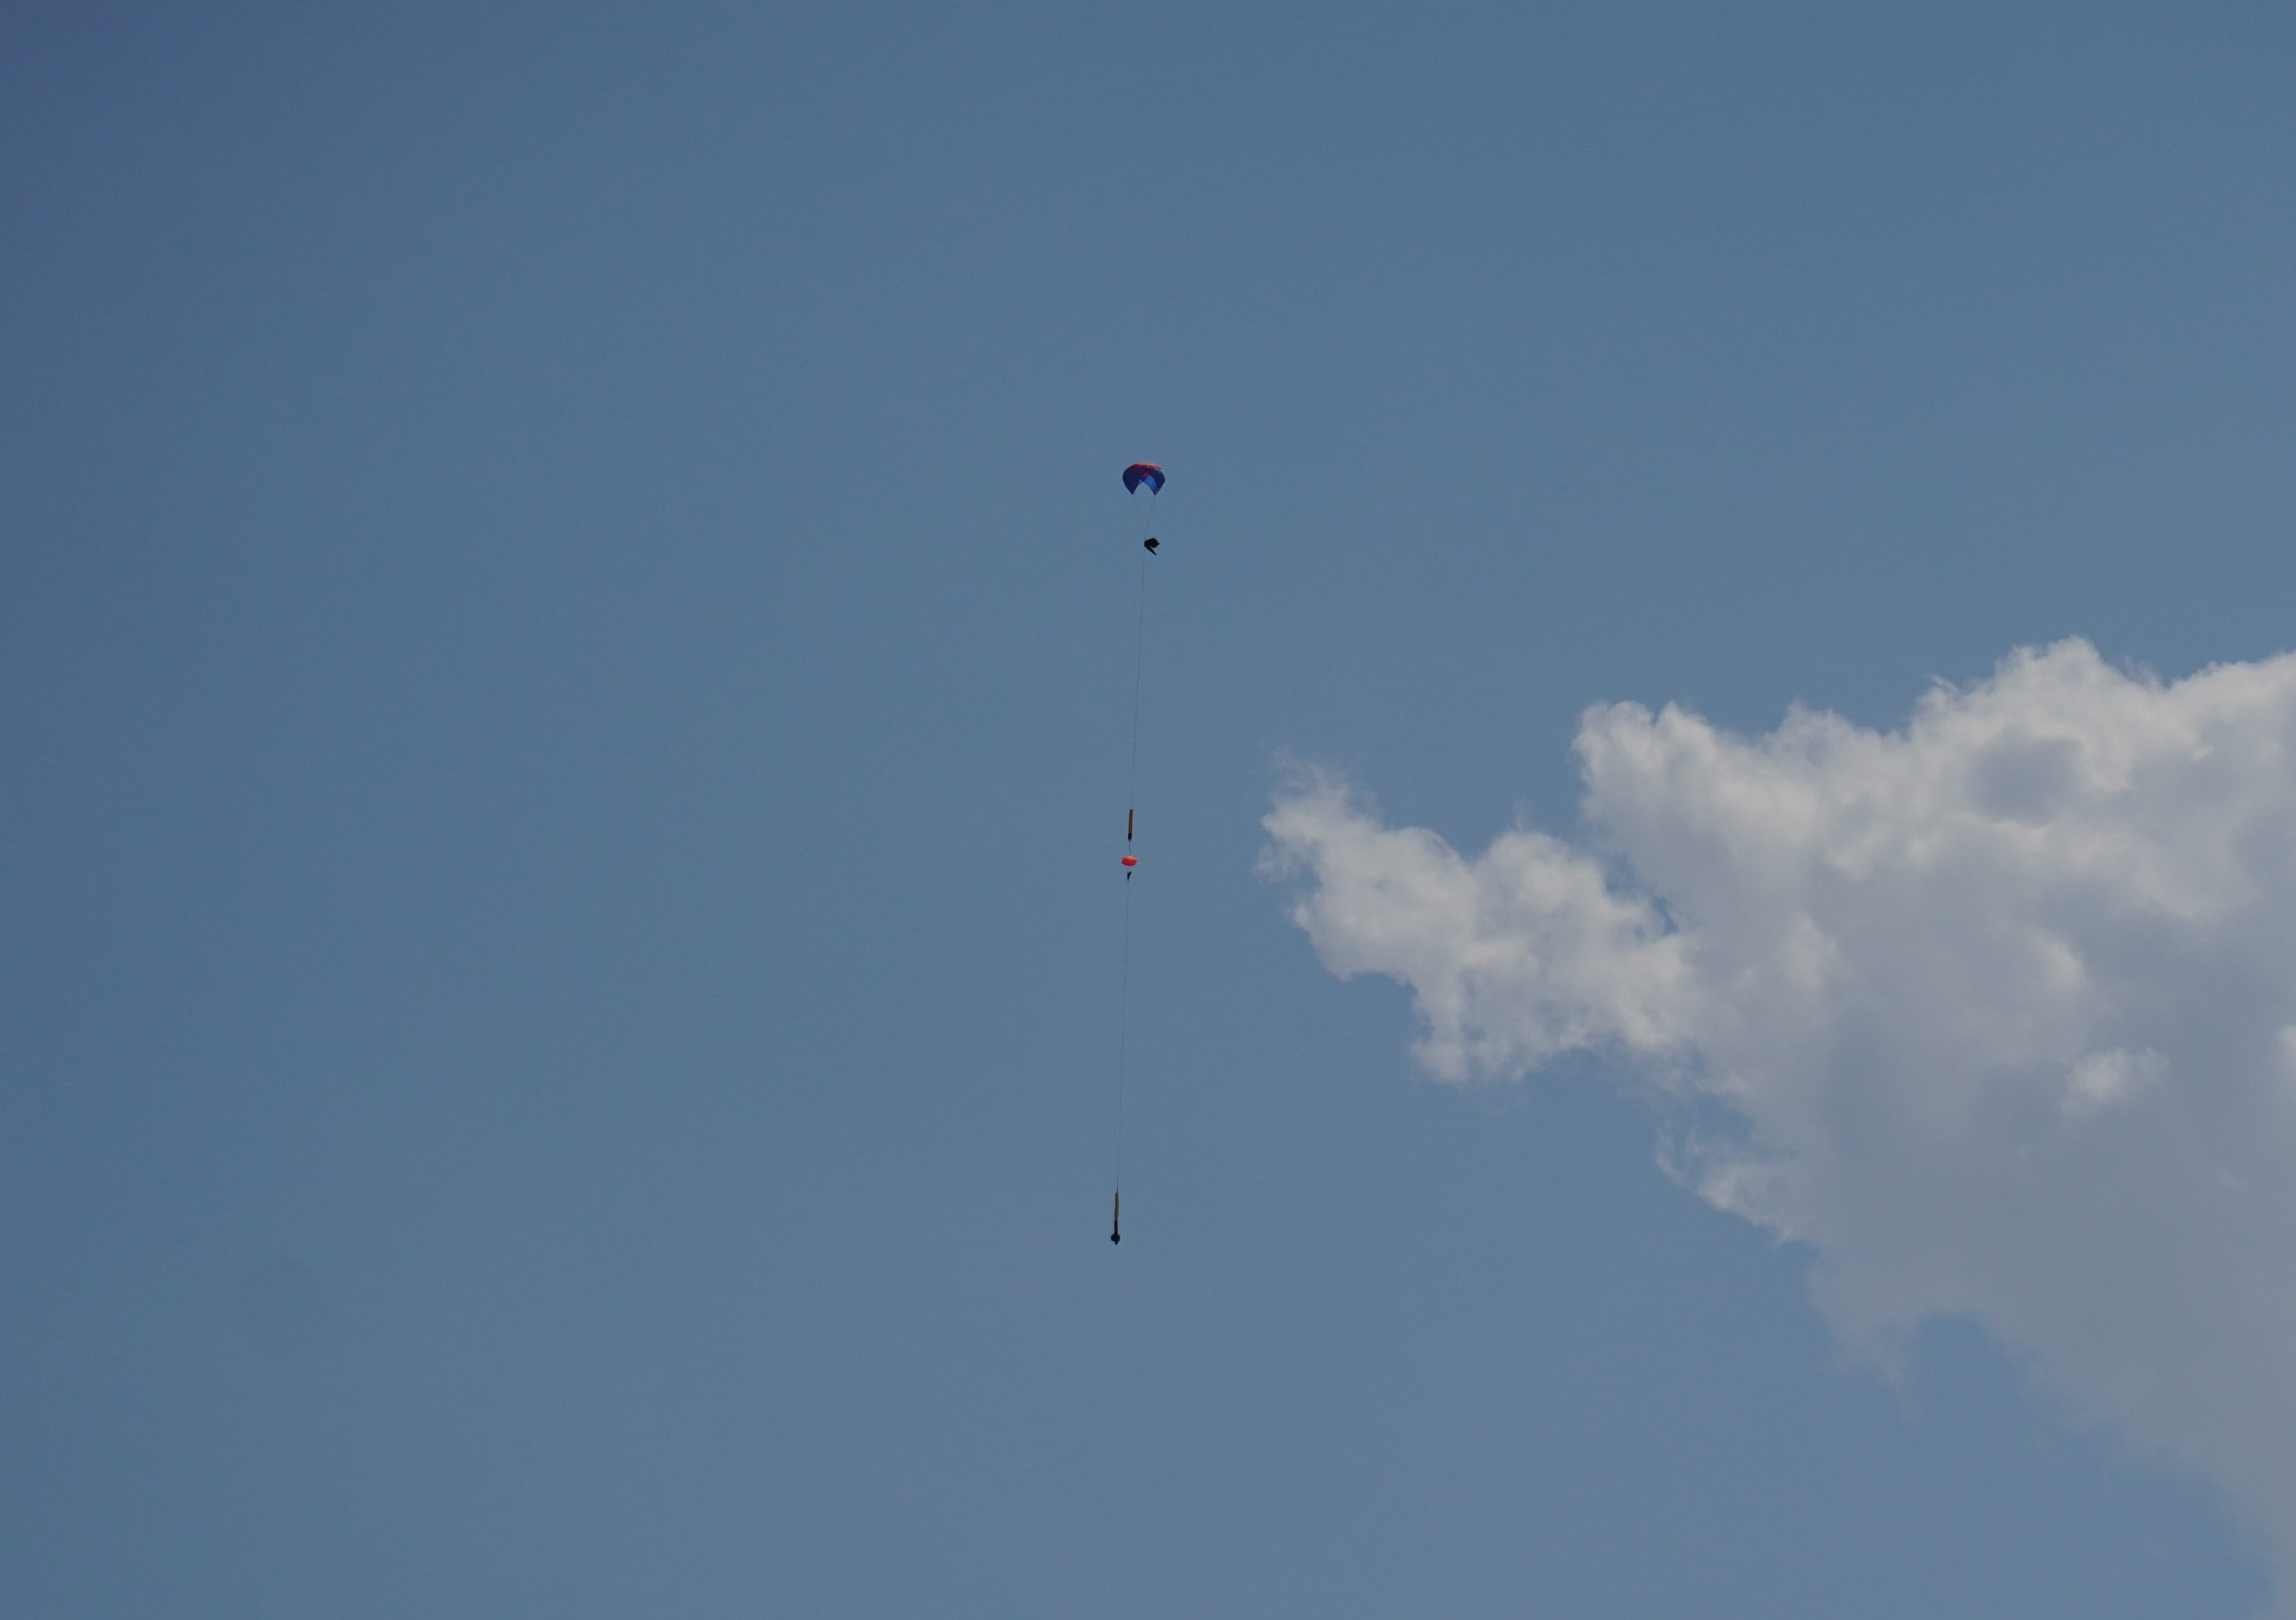
My 17-year-old captured most of these sweet launch photos. He also got a shot of the rocket on its descent after deployment of the main chute.
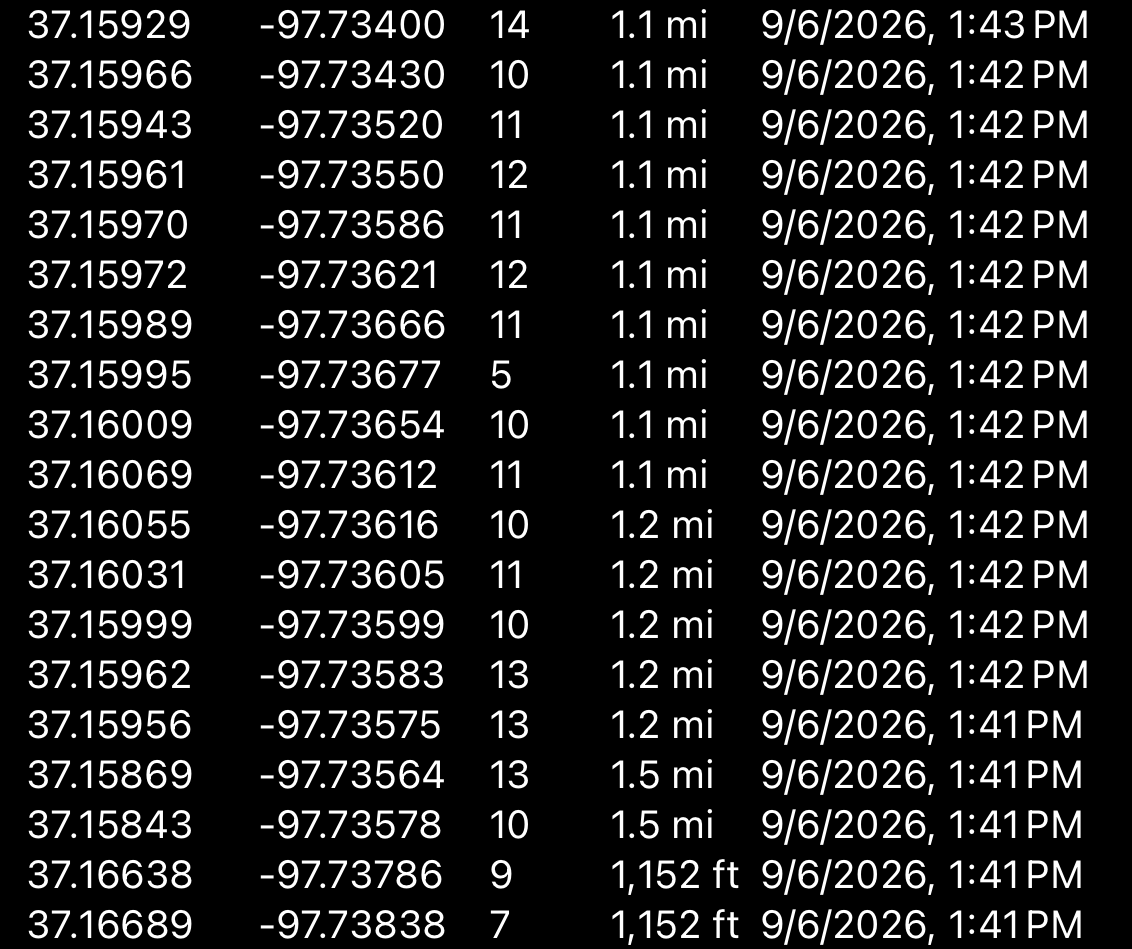
One of the things I enjoy about a launch is when all of the various systems in the rocket work together as planned to enable launch, flight, deployment, tracking, and recovery. As the rocket’s in the sky, real-time telemetry tells us what’s happening with the altitude and deployment events. Meanwhile, the GPS tracker does its thing. Here’s a look at the GPS position log from the Meshtastic app during my flight.
And here’s a screenshot from the map view in the Meshtastic app that I took during one of our recoveries.
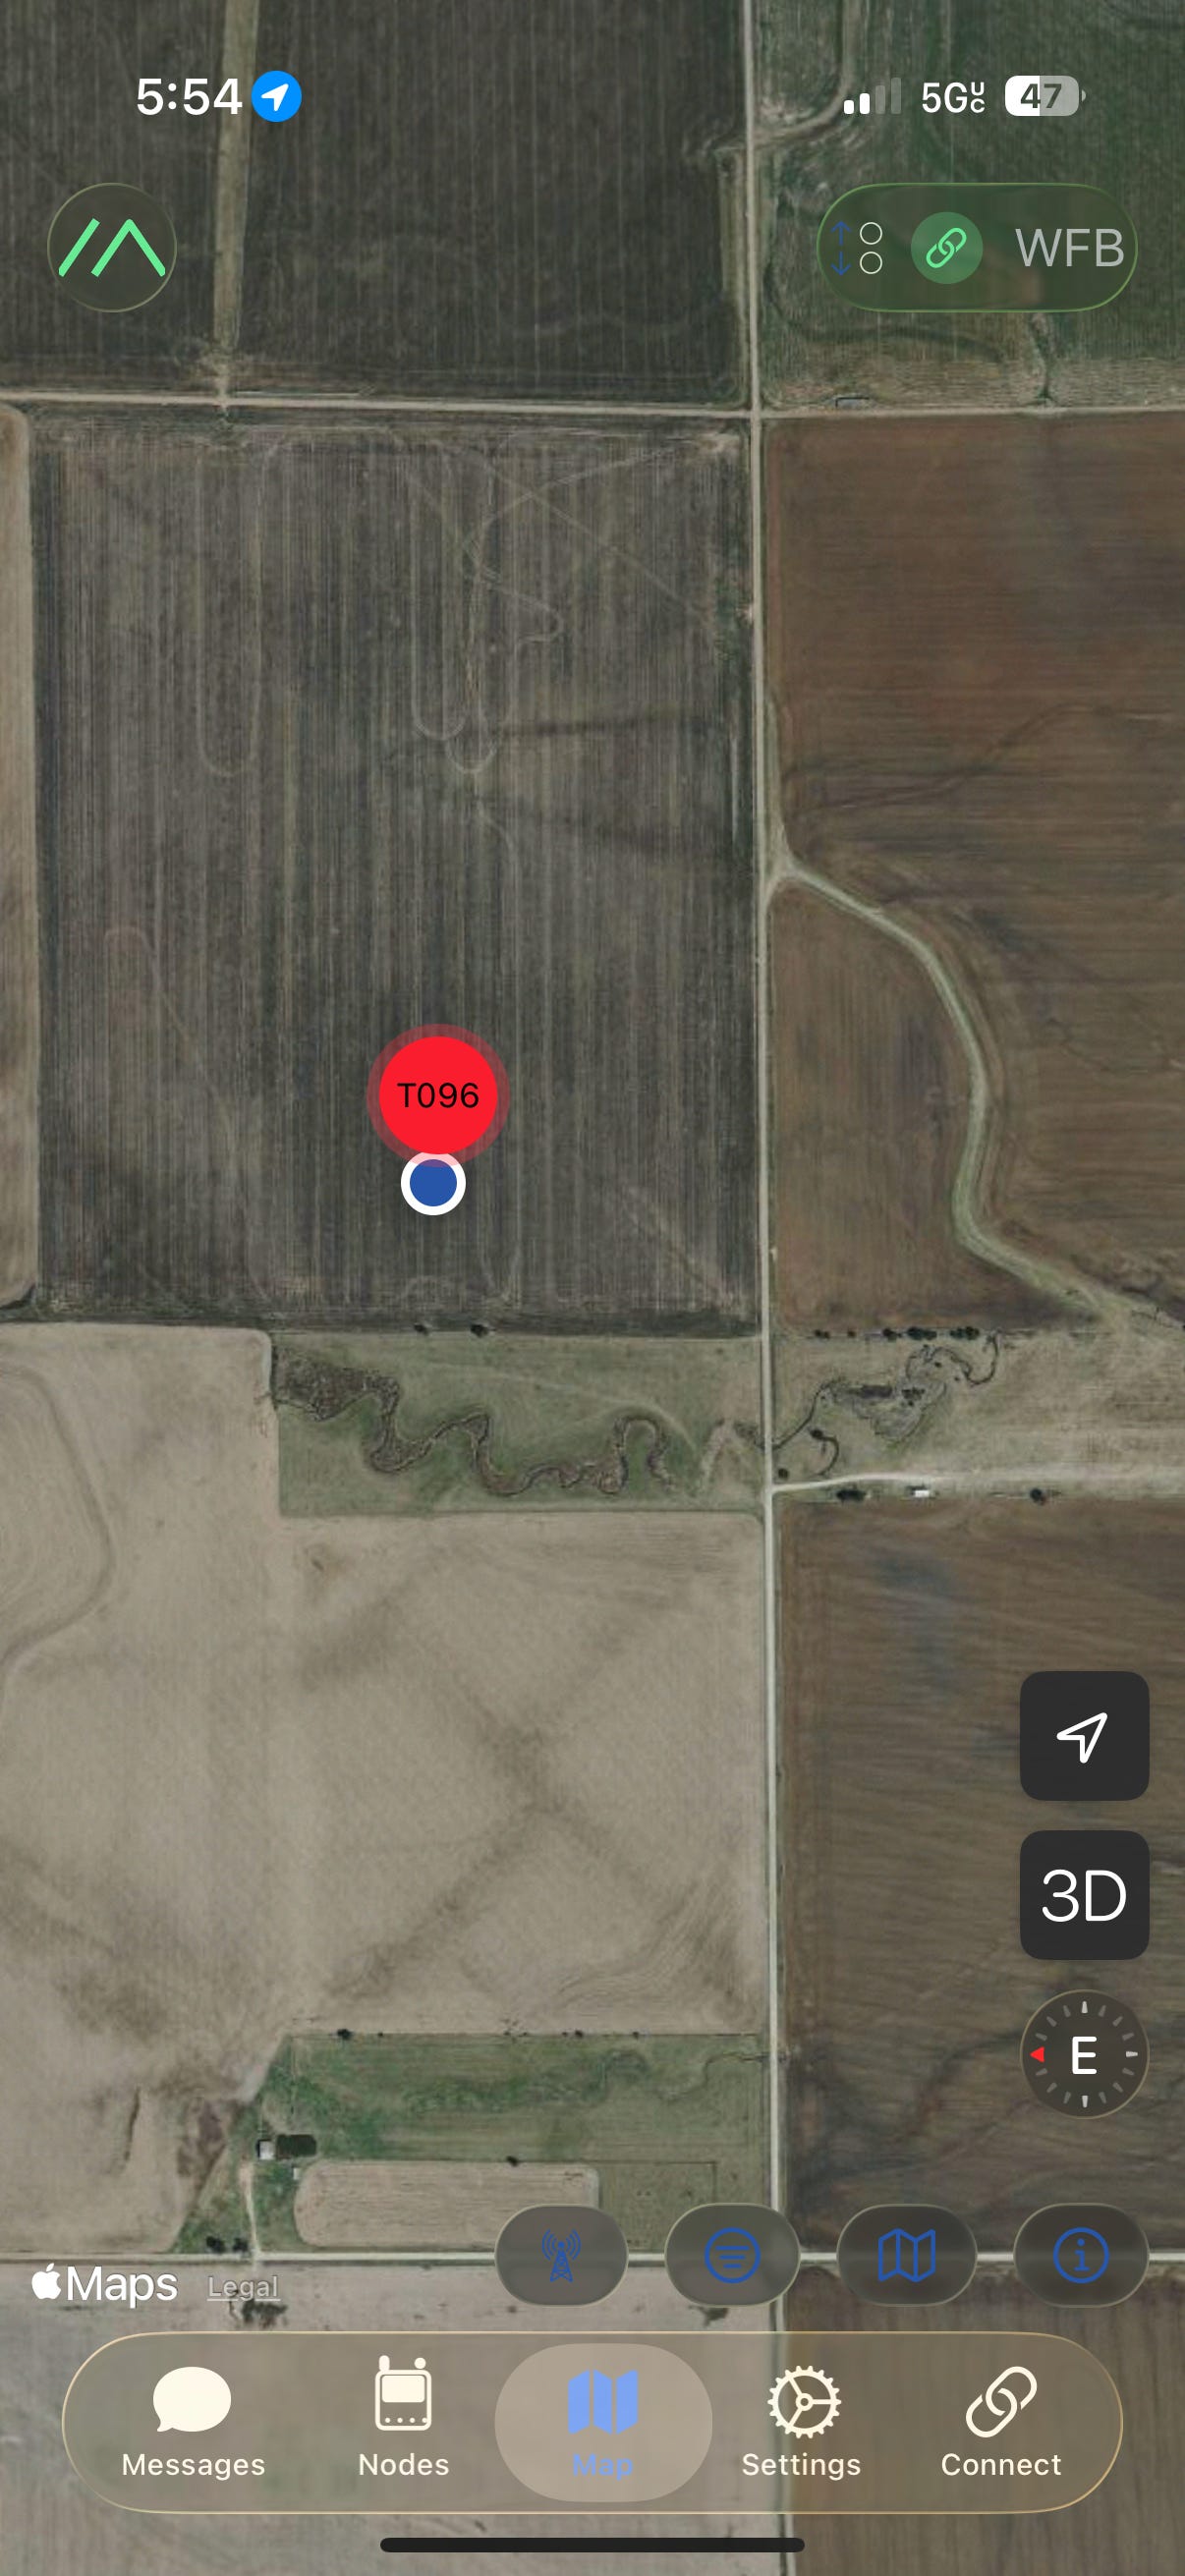
“T096” is our tracker device, and the blue dot is my phone. At this point, we were walking out to pick up the rocket. That’s easier to do when you get a satellite view of exactly where the thing landed.
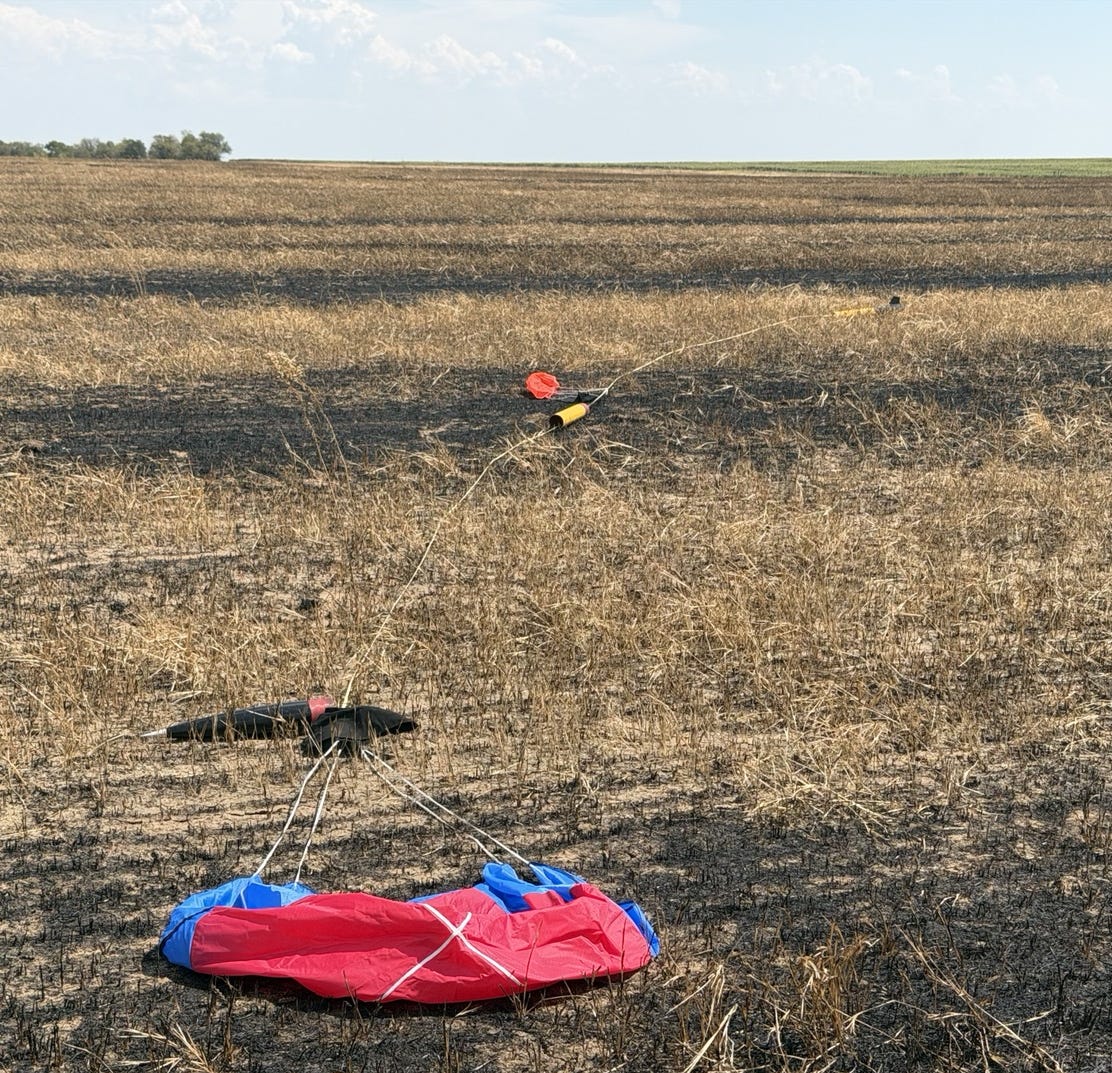
This is how my rocket looked when we got to it. The Kevlar cords holding it together are really long for at least two reasons: to allow the shock of the deployment charges to dissipate when the sections of the rocket pop apart, and to ensure that no two pieces of the rocket bang into each other during the descent under chute.
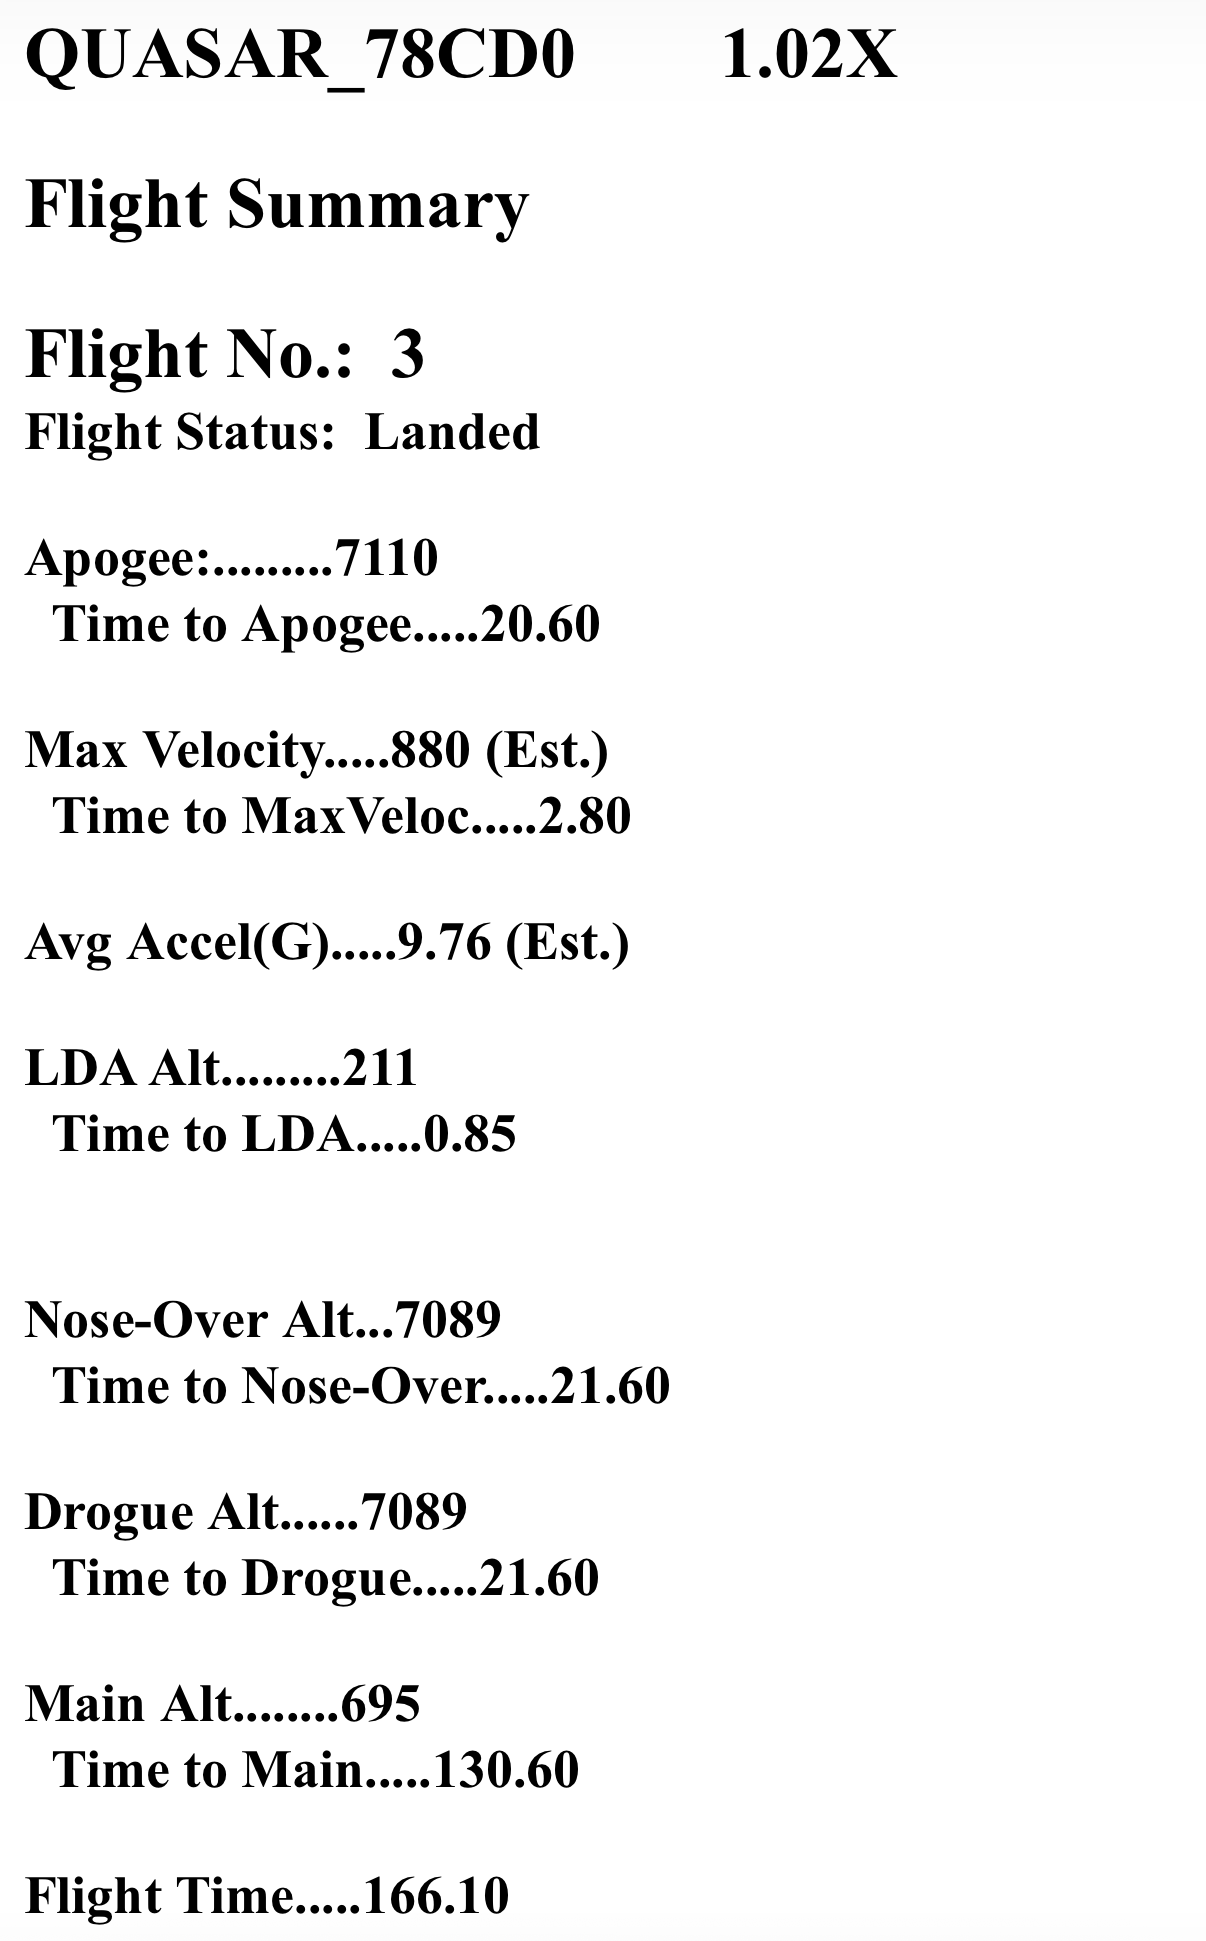
Above is the flight summary from my primary altimeter. Apogee was 7,110 feet above ground level, a bit higher than my son’s rocket on the same type of motor, probably since his fancy dual fins add a bit more drag. The max velocity was 880 feet per second or 600 miles per hour. That’s subsonic, which is what we expected with this K353W motor. Average acceleration was 9.76 Gs.
The rocket nosed over at 7,089 feet, at which point the charge fired to deploy the drogue parachute, while the main-chute charge fired at 695 feet.
So it all went very well indeed.
The next step for me will be to fly this rocket on the L1000W motor, possibly at a launch event in November. A simulation predicts roughly 26 Gs of acceleration, speeds in excess of 1,000 mph or Mach 1.3, and over 12,000 feet of altitude.
After that, we’re already contemplating our next steps for AirFest 2027. Wildman sells a smaller fiberglass kit that can go to over 20,000 feet on an L motor, if you’re willing to work in some tight confines. And there’s always Level 3 high-power certification, which unlocks access to M and higher motors. Hmm.